
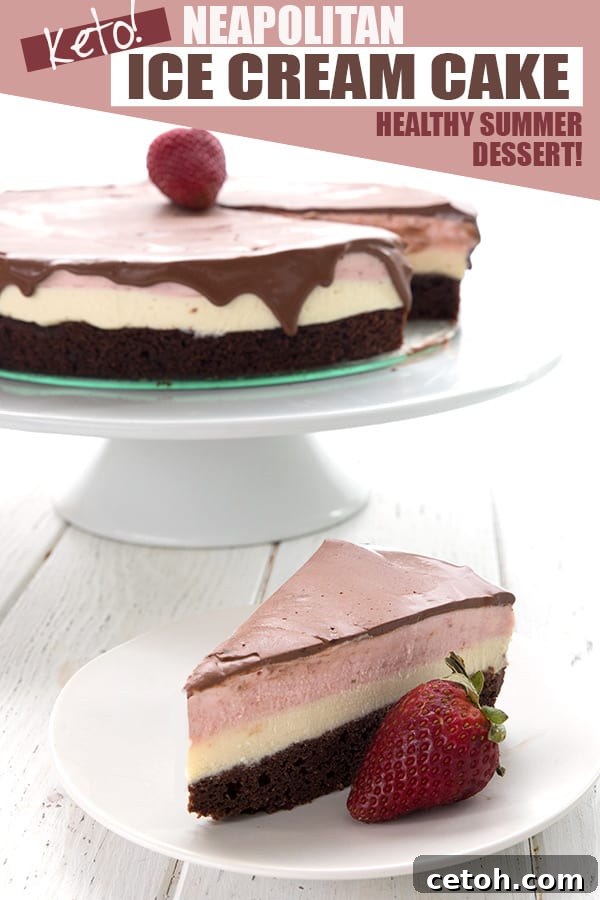
Prepare to be amazed by the ultimate low-carb summer indulgence: a homemade Keto Neapolitan Ice Cream Cake! This truly spectacular dessert features tender layers of sugar-free chocolate cake, generously sandwiched between creamy, no-churn keto vanilla and strawberry cheesecake ice cream, all crowned with a rich, sugar-free chocolate glaze. It’s not just a treat; it’s an experience that will redefine your idea of ketogenic desserts.
As a devoted fan of all things ice cream, I constantly find myself dreaming up new, exciting ways to enjoy this classic dessert while adhering to a low-carb lifestyle. My kitchen has become a laboratory for crafting healthier versions of beloved frozen treats. While I adore simple scoops like my No Churn Maple Pecan Ice Cream and the reliably scoopable Keto Vanilla Ice Cream, sometimes you crave something truly grand. For the chocoholics out there, you might already be familiar with my Death By Chocolate Ice Cream, but this Neapolitan cake takes low-carb indulgence to an entirely new level.
Once you’ve experienced a slice of this magnificent cake, you’ll understand why it becomes an instant obsession. The harmonious blend of a moist chocolate base, smooth vanilla, and vibrant strawberry ice cream, all enrobed in a luscious chocolate glaze, creates a symphony of flavors and textures that is simply unforgettable. It’s the kind of dessert that occupies your thoughts long after the last bite, proving that healthy eating doesn’t mean sacrificing extraordinary taste.
Mastering the Art of No-Churn Neapolitan Keto Ice Cream
Even with access to a high-quality compressor ice cream maker, I’ve found myself increasingly drawn to the simplicity and versatility of no-churn ice cream methods. This approach democratizes the ice cream-making process, making it accessible to anyone, regardless of whether they own specialized equipment. When I embarked on creating a keto-friendly Neapolitan ice cream cake, my goal was to develop a recipe that was not only delicious but also achievable for a wider audience.
My initial research into Neapolitan ice cream cakes led me to a stunning creation from Life, Love, and Sugar. While her blog is celebrated for its decadent, sugar-filled confections, the visual appeal and layered concept of her cake were truly inspiring. I knew I could adapt the core idea to fit the ketogenic dietary guidelines, focusing on sugar-free alternatives and low-carb ingredients.
Interestingly, her original recipe utilized a cheesecake ice cream base made with cream cheese and Cool Whip. While the cream cheese component was a perfect fit for a rich, no-churn texture, Cool Whip, being laden with sugar and artificial ingredients, was definitely out. This challenge led to an exciting discovery: my own sugar-free condensed milk recipe could be blended with cream cheese to create an incredibly smooth, luxurious, and perfectly scoopable no-churn ice cream. This innovative base ensures that our keto Neapolitan layers are every bit as creamy and delightful as their high-carb counterparts, all without the need for an ice cream machine.
Step-by-Step Guide: Crafting Your Keto Neapolitan Ice Cream Cake
While this cake is a multi-layered masterpiece, don’t let its grandeur intimidate you. Each step is designed to be straightforward, ensuring a successful and incredibly rewarding baking experience. Trust me, the effort you put in will be handsomely repaid with every delectable bite.
1. Prepare the Low Carb Sweetened Condensed Milk
The foundation of our no-churn ice cream lies in a special batch of sweetened condensed milk. For this recipe, you’ll be making a slightly larger, extra-sweet version to account for the dilution when mixed with cream cheese and the natural reduction in perceived sweetness when frozen. You can prepare this component first to allow it time to cool, or multitask by making it while your chocolate cake bakes. The recipe includes comprehensive instructions for this specific condensed milk, so there’s no need to adapt a separate recipe. A crucial tip: the blend of sweeteners is essential to prevent recrystallization. If Bocha Sweet is unavailable, allulose or xylitol are excellent alternatives that will yield similar results.
2. Bake the Keto Chocolate Cake Base
The cake layer is a scaled-down, perfectly balanced keto chocolate cake recipe that’s a staple in my repertoire. It’s similar to the one used in my popular Low Carb Triple Chocolate Mousse Cake. For best results, use a 9-inch springform pan. Lining the bottom with parchment paper and lightly greasing it will make the removal of the finished cake much smoother. You have the option of using water or cold coffee in your batter. Coffee, even in small amounts, works wonders by intensifying and enriching the chocolate flavor without imparting any discernible coffee taste to the final product. Once the cake is completely cooled, gently run a sharp knife around the edges of the pan to loosen it. Then, unclip the springform pan sides and immediately clip them back in place. This simple trick prevents the cake from sticking to the pan after a long freeze.
3. Skip the Parchment Collar (Optional but Recommended)
Many ice cream cake recipes suggest creating a parchment paper collar to line the sides of the pan. While this sounds like a good idea in theory, it can be quite fiddly and often refuses to stay put. I’ve attempted this with previous recipes, such as my Mint Chocolate Chip Ice Cream Cake, and even tried it for this Neapolitan version, only to abandon it due to frustration. The good news? It’s entirely unnecessary! Once your cake is thoroughly frozen, the springform pan sides will typically slip right off without any trouble, leaving you with perfectly clean edges.
4. Craft the No-Churn Vanilla Ice Cream Layer
With your homemade condensed milk chilled and ready, creating the vanilla ice cream is wonderfully simple. Just combine it with softened cream cheese in a blender or food processor until perfectly smooth. This is your opportunity to taste the mixture and adjust the sweetness to your preference. Since this recipe is egg-free, there are no health risks associated with tasting. Remember that frozen desserts often taste less sweet than at room temperature, so aim for a slightly sweeter mixture initially. Pour approximately two-thirds of this creamy vanilla mixture over your cooled chocolate cake base, spreading it evenly within the springform pan.
5. Prepare the No-Churn Strawberry Ice Cream Layer
To create the strawberry layer, simply add the pre-prepared strawberry puree to the remaining vanilla mixture in your blender. The strawberry puree should have a touch of Bocha Sweet added to it, which helps prevent the ice cream from freezing too hard and maintains a desirable texture. Blend until the strawberry is fully incorporated and the mixture is a uniform pink hue. Again, taste and adjust sweetness if desired. Carefully spread this luscious strawberry mixture over the vanilla layer in the pan, smoothing the top for a pristine finish. The vibrant contrast of colors is truly a feast for the eyes!
6. Freeze for Ultimate Firmness
This step requires patience, but it’s crucial for the cake’s structural integrity and ease of serving. Place the entire cake, still in its springform pan, into the freezer for a minimum of 6 hours. For the best results and the firmest possible cake, leaving it to freeze overnight is highly recommended. A truly firm cake will ensure clean slices and effortless removal from the pan.
7. Drizzle with Sugar-Free Chocolate Glaze
The final touch is a glossy, sugar-free chocolate glaze. This is a quick and easy step. Simply prepare the glaze as instructed and pour it over the top of your deeply frozen cake. The cold temperature of the cake will cause the glaze to set and firm up almost instantly, creating a beautiful, elegant finish that drizzles enticingly down the sides. A word of caution: sugar-free chocolate glazes tend to develop a grayish tint when stored in the freezer for extended periods. If you’re serving this cake for a special occasion, my top tip is to apply the glaze just before you plan to serve it. This way, it will look absolutely perfect and retain its rich, dark color.
Get ready to impress your guests and satisfy your sweet cravings with this healthy, keto-friendly Neapolitan Ice Cream Cake. It’s sure to be a highlight of any gathering, especially during the warmer months!
Explore More Delicious Keto Ice Cream Creations
If you’ve fallen in love with this Neapolitan Ice Cream Cake, you’re in for a treat! The world of keto ice cream is vast and full of delightful possibilities. Here are a few more low-carb frozen dessert recipes to inspire your next kitchen adventure, perfect for keeping cool and satisfying your sweet tooth without derailing your ketogenic goals:
- Butter Pecan Ice Cream Pie: A rich, nutty, and creamy pie with a fantastic crust.
- Nutter Butter Ice Cream Sandwiches: Recreate this childhood favorite with a healthy twist.
- Snickerdoodle Ice Cream Sandwiches: Soft, cinnamony cookies encasing delicious keto ice cream.
- Peanut Butter Brownie Ice Cream Cake: A decadent combination of two beloved desserts.
- Coffee Ice Cream Cake: For those who love the bold flavor of coffee in their desserts.
- Chocolate Chip Cookie Dough Ice Cream Sandwiches: Enjoy raw cookie dough and ice cream in one amazing bite.
- Peppermint Ice Cream Sandwiches: A refreshing and cool treat, perfect for any time of year.
Keto Neapolitan Ice Cream Cake
You won’t find a more spectacular keto dessert than this homemade Neapolitan Ice Cream Cake! Tender low carb chocolate cake with layers of no-churn keto ice cream and a sugar-free chocolate glaze.
Servings: 16 people
Prep Time: 40 mins
Cook Time: 1 hr
Equipment
- 9-inch springform pan
Ingredients
Cake:
- 1 cup almond flour
- 1/4 cup Swerve Sweetener
- 1/4 cup cocoa powder
- 1 1/2 tsp baking powder
- 1/4 tsp salt
- 2 large eggs, room temperature
- 1/2 cup butter, melted
- 1/2 tsp vanilla extract
- 2 to 4 tbsp cold coffee or water
Ice Cream:
- 2 cups heavy whipping cream
- 1/2 cup Bocha Sweet, divided (or allulose or xylitol)
- 6 tbsp powdered Swerve Sweetener
- 3 tbsp butter
- 1 tsp vanilla extract
- 1/2 tsp xanthan gum
- 1 cup chopped fresh strawberries
- 12 ounces cream cheese, softened
Chocolate Glaze:
- 1/2 cup heavy whipping cream
- 2 ounces unsweetened chocolate, chopped and cut into chunks
- 1/4 cup powdered Swerve Sweetener
- 1/2 tsp vanilla extract
Instructions
Cake:
- Preheat the oven to 325F and grease a 9-inch springform pan well. Line the bottom with parchment paper and grease the parchment.
- In a medium bowl, whisk together the almond flour, cocoa powder, baking powder, and salt. Add the eggs, melted butter, and vanilla extract and stir to combine. Add the coffee or water 1 tablespoon at a time until a spreadable consistency is achieved. The batter should not be pourable.
- Spread the batter evenly in the prepared baking pan and bake 30 minutes or until just firm to the touch. Remove and let cool completely. Once it’s completely cool, run a sharp knife around the edges of the pan and loosen the sides. Then tighten the sides back on (this is just to ensure the cake does not stick to the pan sides after freezing).
Ice Cream:
- In a large heavy saucepan over medium heat, combine the whipping cream with 6 tablespoons of the Bocah Sweet and all of the powdered Swerve. Bring to just a boil, then reduce the heat and simmer gently for 30 minutes. Watch carefully as you want it to simmer but not continue to boil. There should be little bubbles along the edges the whole time.
- Remove from heat and whisk in the butter until melted. Sprinkle the surface with the xanthan gum and whisk vigorously to combine. Let cool to room temperature, about 20 minutes.
- Meanwhile, place the strawberries in a blender with the remaining 2 tablespoons of Bocha Sweet. Puree and set aside.
- In a large food processor, combine the cream cheese and the cream mixture. Blend until very smooth. Taste for sweetness and if you want it a bit sweeter, add more powdered Swerve. Add more vanilla if desired.
- Spread about 2/3 of this mixture evenly over the cooled cake.
- Add the strawberry puree to the remaining mixture in the food processor and blend to combine, scraping down the sides of the food processor to ensure it all mixes in. Again, taste for sweetness.
- Spread this mixture over the vanilla in the pan, smoothing the top. Freeze until firm, about 6 hours.
Chocolate Glaze:
- In a small saucepan over medium heat, bring the cream to just a simmer. Remove from heat and add the chopped chocolate. Let sit a few minutes to melt and then whisk in the sweetener and vanilla.
- Let thicken about 5 minutes, then pour over the top of the cake and let drizzle down the sides. It will harden quickly on the frozen cake.
- To serve, heat a sharp knife briefly in hot water or over the flame of gas stove (this is what I do!). Slice straight down, making sure to cut through the bottom cake layer. Work a spatula under the cake but over the parchment paper.
Nutrition
Serving: 1 serving = 1/16th of cake | Calories: 354kcal | Carbohydrates: 6.2g | Protein: 5.2g | Fat: 32.7g | Fiber: 2g
I’d love to know your thoughts, leave your rating below!