
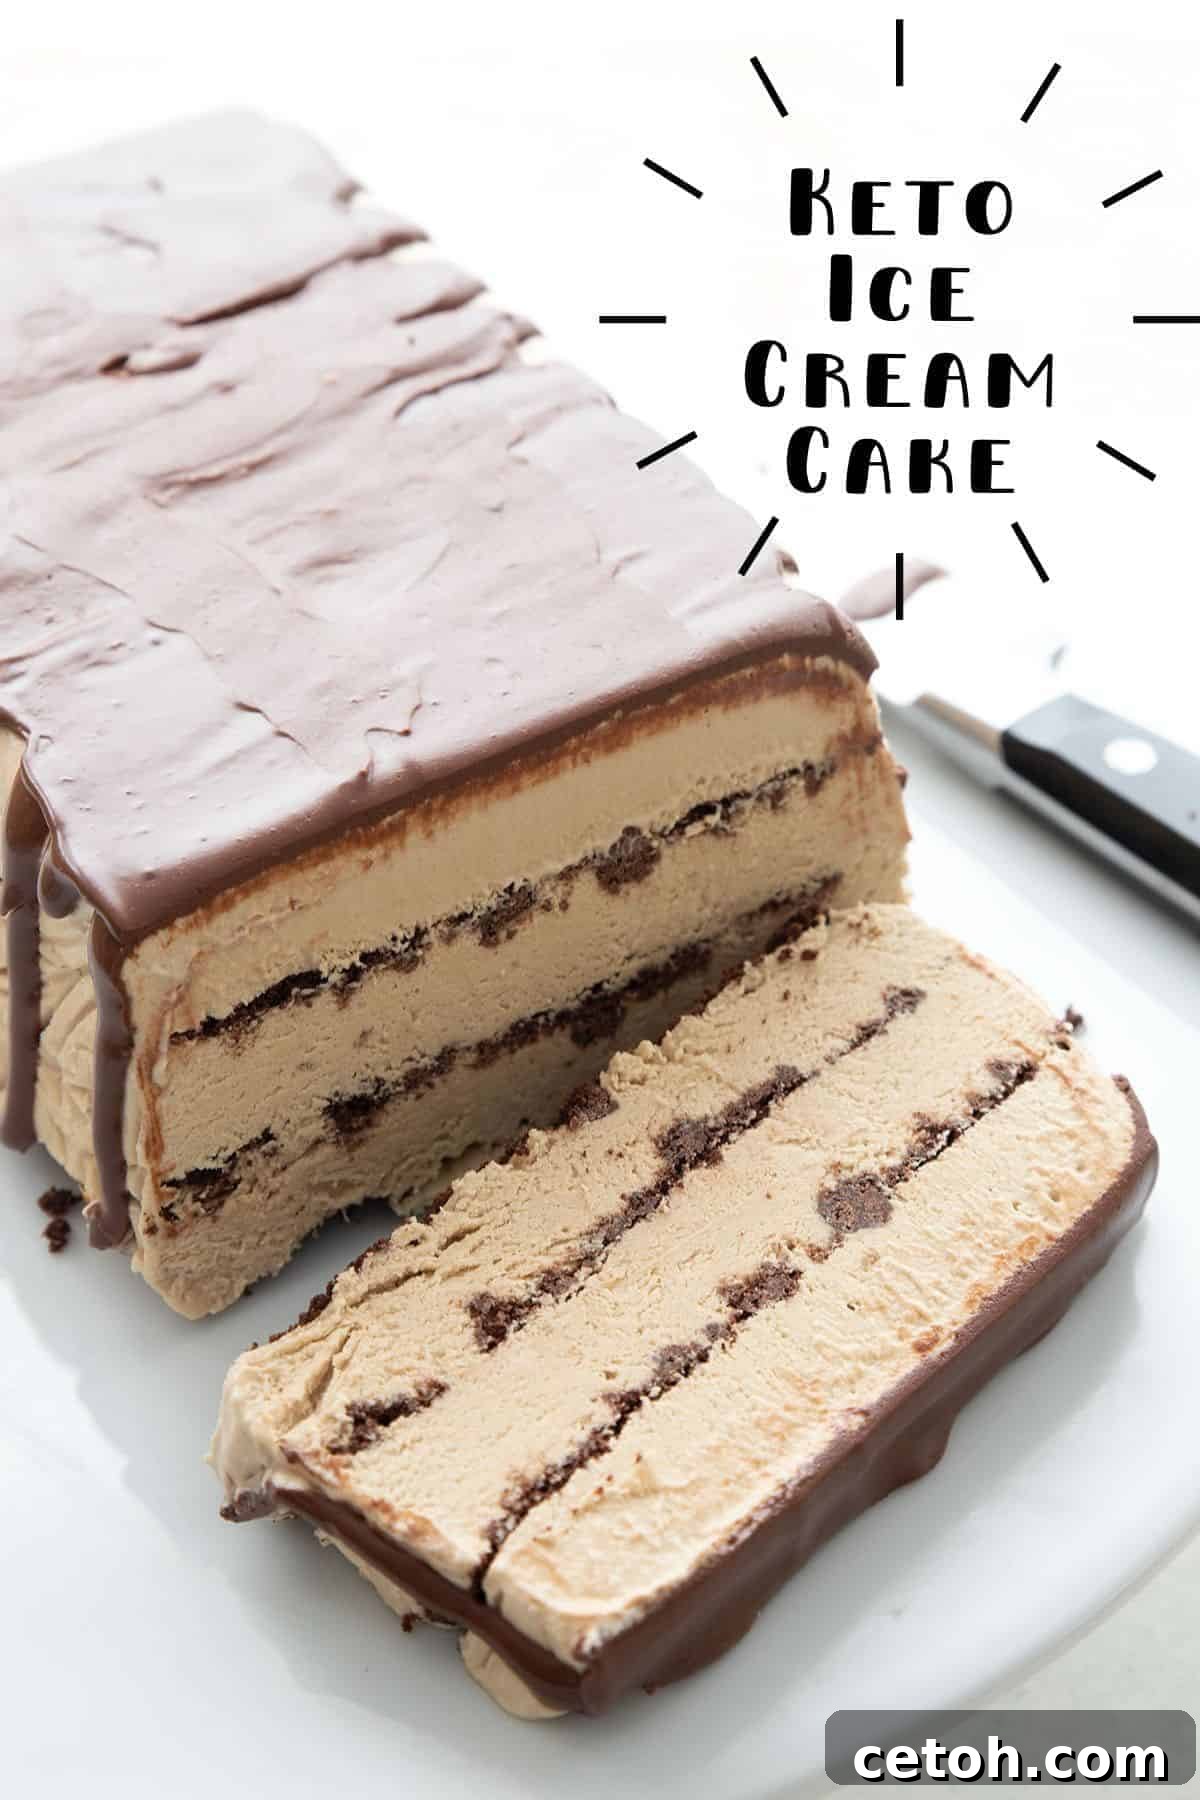
This keto ice cream cake is more than just a dessert; it’s a magnificent, layered creation designed to impress and delight everyone at your table, all while adhering to your low-carb lifestyle. Imagine a stunning stack of creamy, sugar-free ice cream, punctuated by a delightful, crispy brownie crumble, and crowned with a luscious chocolate ganache glaze. The best part? It looks incredibly intricate, but is surprisingly simple to assemble, requiring no special ice cream maker thanks to a fantastic no-churn base. You’ll have everyone convinced you spent hours perfecting this culinary masterpiece, when in reality, it’s a fuss-free dream come true.
Seriously, consider this your culinary alert! Clear your schedule, gather your ingredients, and prepare to embark on a journey to create this truly phenomenal sugar-free ice cream cake. Its exceptional taste and elegant presentation make it worthy of any celebration, big or small. Despite its gourmet appearance, it’s remarkably straightforward to prepare, allowing you to bask in compliments without revealing your effortless secret. This recipe is an absolute must-add to your collection of keto ice cream recipes. Its irresistible charm and delightful flavor will have you dreaming of your next slice, just like we are already planning to make it again very soon.
Why You’ll Adore This Keto Ice Cream Cake
This isn’t just another dessert; it’s a testament to how incredible low-carb living can be without sacrificing taste or indulgence. Here’s why this keto ice cream cake will become your new favorite:
- Unforgettable Flavor & Texture Combination: Each bite offers a harmonious blend of creamy, smooth ice cream and a satisfying, crisp brownie crumble, all enhanced by a rich, decadent chocolate ganache. It’s a multi-textured delight that truly satisfies.
- Effortlessly Elegant: Despite its sophisticated, layered look, this cake is incredibly easy to assemble. Even novice bakers will find themselves creating a dessert that looks like it came from a high-end patisserie.
- Perfectly Keto & Sugar-Free: Ideal for anyone following a ketogenic diet or simply looking to reduce their sugar intake. You can enjoy a generous slice without the guilt, knowing it aligns with your health goals.
- Highly Customizable: One of the greatest advantages of this recipe is its adaptability. You have the freedom to choose your favorite keto ice cream flavors and crumbly toppings, making each cake a unique creation tailored to your preferences.
- No-Churn Convenience: Forget about cumbersome ice cream makers. Our recommended no-churn ice cream base simplifies the process, making homemade ice cream more accessible than ever. For those who prefer, store-bought keto options work beautifully too.
- Make-Ahead Marvel: This frozen dessert is perfect for meal prepping or preparing for special occasions in advance. It stores wonderfully in the freezer, allowing you to enjoy fresh, perfectly set slices whenever a craving strikes or guests arrive.
Crafting Your Masterpiece: Customizing Your Ice Cream Cake Flavors
The beauty of this sugar-free ice cream cake lies in its incredible versatility. You’re not just following a recipe; you’re creating a personalized dessert experience. The two main components that offer the most room for customization are the keto ice cream and the crunchy cookie crumble. Let’s explore your delicious options.
Your Keto Ice Cream Foundation: Homemade or Store-Bought?
When it comes to the ice cream layer, you have complete control over flavor and origin. Whether you prefer to whip up your own or grab a carton from the store, this cake will be a hit.
- Homemade No-Churn Keto Ice Cream: This is my personal favorite for its simplicity and luscious texture. A “no-churn” recipe means you don’t need a specialized ice cream machine – just a few common ingredients and a freezer. For this recipe, I initially opted for my incredibly popular keto coffee ice cream. The rich, bold coffee flavor pairs exquisitely with chocolate and provides a sophisticated twist. However, don’t feel limited!
- Vanilla Variation: Simply omit the instant coffee from the recipe to create a classic, creamy keto vanilla ice cream. This is a fantastic base for any topping.
- Fruity Fun: For a refreshing, summery twist, consider using my no-churn keto strawberry ice cream. The vibrant berry notes offer a delightful contrast to the chocolate ganache.
- Chocolate Indulgence: Blend in some unsweetened cocoa powder to your vanilla base for a deep, rich keto chocolate ice cream.
- Nutty Flavors: Swirl in sugar-free peanut butter, almond butter, or crushed keto-friendly nuts for added texture and flavor.
- Store-Bought Keto Ice Cream: If time is of the essence, or you simply have a favorite keto brand, store-bought ice cream works perfectly. You’ll need at least two pints (or approximately 4 cups) for this cake. Remember, store-bought options typically require softening for about 20-30 minutes at room temperature before you can easily spread them into layers. Always check the nutrition label for net carbs and sugar alcohols to ensure it aligns with your dietary needs. Look for brands that use erythritol, stevia, or monk fruit as sweeteners.
The Crispy Crumble: Essential for Texture Contrast
The crunchy layer is crucial for providing a delightful textural contrast to the smooth ice cream. It adds a satisfying bite and extra flavor. While my go-to choice for a quick and easy option is HighKey Brownie Bites, there are numerous other fantastic alternatives:
- Homemade Keto Brownie Bark: If you’re up for a little extra baking, my keto brownie bark is an excellent choice. You’ll only need about one-quarter of the recipe to create the perfect amount of crumble for this ice cream cake. It provides a rich, chewy-crisp chocolate base.
- Other Keto Cookie Crumbles: Any crispy, sugar-free cookie can be transformed into a delicious crumble. Consider crushing keto chocolate chip cookies, shortbread cookies, or even peanut butter cookies for different flavor profiles.
- Chopped Nuts: For a naturally crunchy, low-carb option, finely chop toasted pecans, walnuts, or almonds. These add a wonderful depth of flavor and satisfying crunch.
- Toasted Coconut Flakes: For a tropical twist, lightly toast unsweetened coconut flakes until golden and fragrant. They add a delicate crispness and unique flavor.
Effortless Assembly: Your Guide to Making Sugar-Free Ice Cream Cake
Once you’ve decided on your perfect combination of keto ice cream and crunchy crumble, assembling this impressive layered dessert is surprisingly straightforward. Using a standard 9×5 inch loaf pan makes for easy slicing and serving. Follow these simple steps to create a show-stopping sugar-free ice cream cake that’s sure to become a favorite.
Essential Ingredients You’ll Need:
- Keto Ice Cream of Choice: Approximately 2 pints or 4 cups. Ensure it’s slightly softened if store-bought, or prepared as a no-churn mixture (without the final freezing step) if homemade.
- Keto Cookie Crumble of Choice: Roughly 3/4 cup of coarse crumbs. Whether it’s crushed HighKey brownie bites, homemade brownie bark, or another keto-friendly crispy cookie.
- Sugar-Free Dark Chocolate: 1 1/2 ounces (e.g., ChocZero chips or your preferred sugar-free chocolate brand) for the decadent ganache.
- Heavy Whipping Cream: 1/4 cup, for creating the silky-smooth chocolate ganache.
Step-by-Step Method for Assembly:
- Prepare Your Loaf Pan: Begin by lining a standard 9×5 inch loaf pan completely with plastic wrap or parchment paper. Make sure to leave an overhang on the sides – this will act as “handles” later, making it effortless to lift the cake out of the pan.
- First Ice Cream Layer: Take about one-third of your chosen keto ice cream (roughly 1 and 1/3 cups). If using homemade no-churn keto ice cream, it should be in its soft, spreadable state before the final freeze. If using store-bought keto ice cream, allow it to soften at room temperature for approximately 20-30 minutes until it’s easy to spread but not completely melted. Spread this first layer evenly at the bottom of the lined loaf pan.
- Initial Freeze for Stability: Place the pan in the freezer for at least 1 hour. This crucial step allows the first ice cream layer to firm up, preventing the cookie crumble from sinking and ensuring distinct, beautiful layers with a desirable textural contrast.
- Add the First Crumble Layer: Once the ice cream is firm, remove the pan from the freezer. Evenly sprinkle one-third of your chosen cookie crumble over the hardened ice cream layer.
- Repeat for Layers: Repeat steps 2, 3, and 4 two more times. This means you’ll add another third of the ice cream, freeze for 1 hour, then add another third of the crumble. Follow with the final layer of ice cream, and then the last layer of crumble. Ensure you freeze the cake for at least 1 hour after each ice cream layer is added. For best results and ultimate firmness, after the final crumble layer and ice cream layer are added, freeze the entire cake overnight.
- Effortless Removal from Pan: When you’re ready to serve, the cake may initially stick slightly if it’s fresh out of the deep freezer. Simply let the cake sit out at room temperature for about 10-15 minutes. Then, using the overhang of plastic wrap or parchment paper as handles, gently lift the cake out of the loaf pan and transfer it to a serving platter. Carefully peel away the plastic wrap or parchment.
- Prepare the Decadent Ganache: While the cake is setting or softening slightly, prepare your chocolate ganache. In a medium, heat-proof bowl, place your sugar-free chocolate chips. In a small saucepan or microwave-safe bowl, gently heat the heavy whipping cream until it just begins to simmer (do not boil). Pour the hot cream over the chocolate chips and let it sit undisturbed for about 5 minutes. This allows the heat from the cream to melt the chocolate.
- Whisk and Drizzle: After 5 minutes, whisk the chocolate and cream mixture until it becomes perfectly smooth, glossy, and uniform. Drizzle this rich chocolate ganache generously over the top of your spectacular ice cream cake.
- Slice and Serve with Pride: For the cleanest slices, use a sharp knife warmed under hot water and wiped dry between cuts. Slice your magnificent sugar-free ice cream cake and serve immediately to your eager family and friends!
Pro Tips for Ice Cream Cake Perfection
Achieving a perfectly layered and delicious keto ice cream cake is simple with these expert tips:
- Patience is a Virtue (and Key to Layers): Don’t rush the freezing steps between layers. Each hour in the freezer ensures that your ice cream firms up sufficiently, preventing the layers from merging and maintaining those beautiful, distinct lines.
- The Right Ice Cream Consistency: Whether homemade or store-bought, your ice cream should be soft enough to spread easily but not so melted that it’s liquid. A slightly softened consistency makes it easy to work with without creating a messy final product.
- Warm Knife for Clean Slices: For bakery-perfect slices, dip your knife in hot water and wipe it dry before each cut. This technique helps the blade glide through the frozen layers without tearing them.
- Ganache Timing: While the cake itself can be made well in advance, for the freshest and shiniest glaze, I recommend preparing and drizzling the chocolate ganache on the day you plan to serve the cake. It will look its best and most appealing.
- Crush Crumble to Perfection: Ensure your brownie bites or other cookie crumble are crushed to a “coarse crumb” consistency. You want small pieces that offer crunch, not fine dust that disappears into the ice cream. A rolling pin or food processor works wonders here.
- Prevent Freezer Burn: When storing your finished cake, make sure it’s tightly wrapped in plastic wrap, then perhaps a layer of aluminum foil, or stored in an airtight container. This protects it from freezer burn and keeps it fresh for longer.
Frequently Asked Questions About Sugar-Free Ice Cream Cake
Absolutely! Using your favorite store-bought keto-friendly ice cream is a fantastic shortcut. Just ensure you have at least two pints (approximately 4 cups) to achieve the desired thickness for your layers. The most important tip for store-bought ice cream is to let it soften at room temperature for about 20 to 30 minutes before you attempt to spread it. This makes it pliable enough to work with without being too runny. Always double-check the ingredient list for hidden sugars and carbohydrates to ensure it aligns with your ketogenic goals.
Yes, transforming this into a dairy-free keto ice cream cake is entirely possible! You’ll need to use a dairy-free keto ice cream that you enjoy – there are many excellent coconut milk or almond milk-based options available now. For the crunchy crumble, make sure your chosen cookies or nuts are also dairy-free. Finally, for the chocolate ganache, simply substitute the heavy whipping cream with full-fat canned coconut cream. Chill the can of coconut cream overnight, then scoop out the thick cream from the top, leaving the liquid behind, to get the best consistency for your ganache.
One of the greatest benefits of frozen desserts like this is their excellent make-ahead potential! You can easily prepare the entire cake several days, or even weeks, in advance and store it in the freezer. This frees up your time on the day of your event. For the most pristine and shiny appearance of the chocolate ganache, however, I recommend preparing and drizzling it over the cake on the same day you plan to serve it. This ensures the glaze looks its absolute best.
Proper storage is key to maintaining the quality of your keto ice cream cake. Once fully assembled and frozen, place the cake on a platter or back into the loaf pan (if it fits snugly) and cover it tightly with multiple layers of plastic wrap. For extra protection against freezer burn and to prevent any odors from other freezer items from permeating the cake, you can add an additional layer of aluminum foil. Stored correctly, this delicious dessert will keep beautifully in the freezer for up to two months, ready to be enjoyed whenever you desire.
While a 9×5 inch loaf pan is ideal for its easy-to-slice rectangular shape, you can absolutely adapt this recipe to other pans. A round 8-inch or 9-inch springform pan would create a stunning circular cake. Just be mindful that the layers might be thinner, or you might need to adjust the quantities of ice cream and crumble slightly to achieve the desired height. Ensure the springform pan is lined on the bottom and sides for easy release. The freezing times between layers will remain critical regardless of the pan shape.
Net carbs are the carbohydrates that your body actually digests and converts into glucose. For ketogenic diets, these are the carbs that count towards your daily limit. You calculate net carbs by taking the total carbohydrates and subtracting dietary fiber and (for some) sugar alcohols. In this recipe, the sugar-free ingredients help keep the net carb count low, allowing you to enjoy a sweet treat without derailing your ketosis. Always check ingredient labels carefully, as some sugar alcohols can still impact blood sugar or cause digestive upset for sensitive individuals.
Explore More Delicious Keto Ice Cream Creations
If you loved this sugar-free ice cream cake, you’ll be thrilled to discover more delightful keto-friendly frozen desserts. Here are some of our top picks to satisfy your sweet tooth without the sugar!
- Peanut Butter Brownie Ice Cream Cake
- Easy Ice Cream Truffles
- Snickerdoodle Ice Cream Sandwiches
- Neapolitan Ice Cream Cake
- Butter Pecan Ice Cream Pie
- Keto Ice Cream Bars
Easy Sugar Free Ice Cream Cake
12 servings
Ingredients
Ice Cream Cake
- 1 recipe keto coffee ice cream
- 1 1/2 packages HighKey brownie bites, (about 3/4 cup of coarse crumbs)
Chocolate Glaze
- 1 1/2 ounces dark chocolate chips, sugar-free
- 1/4 cup heavy whipping cream
Instructions
Ice Cream Cake
-
Line a 9×5 inch loaf pan with plastic wrap or parchment paper, ensuring an overhang on the sides for easy removal.
-
Prepare the ice cream according to its directions, but do not perform the final freezing step if homemade. If using store-bought, soften it for 20-30 minutes. Spread one third (about 1 and 1/3 cups) of the ice cream mixture evenly in the prepared pan. Place in the freezer for 1 hour to set.
-
Crush the brownie bites (or chosen crumble) using a rolling pin or a kitchen mallet until coarse crumbs are formed. Remove the pan from the freezer and sprinkle with 1/3 of the crushed brownie bites over the firm ice cream layer.
-
Repeat this layering process two more times: another layer of ice cream, freeze for 1 hour, then another layer of crumble. Follow with the final ice cream layer and the last crumble layer. Freeze the entire cake overnight for best results.
-
When ready to serve, let the cake sit out for about 10-15 minutes to slightly soften. Then, using the plastic wrap or parchment paper overhang, gently lift the cake from the loaf pan onto a serving platter. Carefully remove the lining.
Chocolate Glaze
-
Place the sugar-free chocolate chips in a medium heat-proof bowl. Heat the heavy whipping cream in a small saucepan or microwave until it just begins to simmer. Pour the hot cream over the chocolate chips and let it sit undisturbed for 5 minutes to melt the chocolate.
-
Whisk the mixture until it becomes smooth, glossy, and well combined. Drizzle this rich chocolate ganache generously over the top of the ice cream cake.
-
Serve immediately for the best texture and appearance, or return to the freezer until you are ready to serve. For neat slices, warm your knife under hot water and wipe it dry before each cut.
Nutrition
We’d love to hear your thoughts and see your creations! Leave your rating and comments below!