
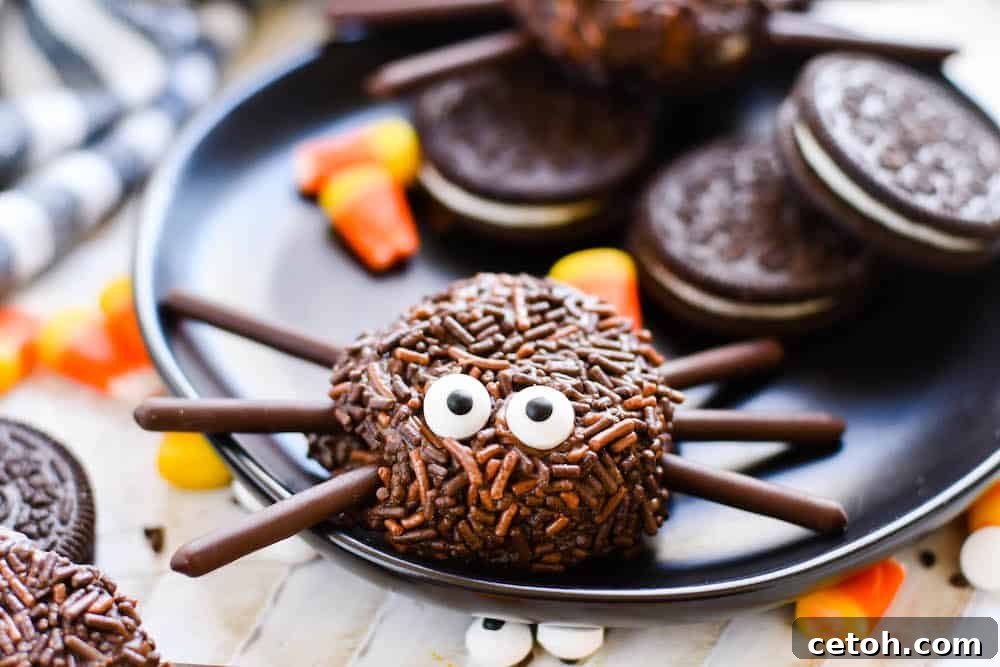
Spooktacularly Simple: Easy Halloween Spider Cookies Recipe
Welcome to the enchanting world of Halloween treats, where spooky meets sweet! As the leaves turn and a crisp chill fills the air, there’s no better time to gather your little ghouls and goblins for a fun-filled kitchen adventure. This year, ditch the complicated baking and dive into the delightful simplicity of these Easy Halloween Spider Cookies. Designed with both ease and creativity in mind, these no-bake wonders are guaranteed to be the star of any Halloween party, school event, or just a cozy family night in.
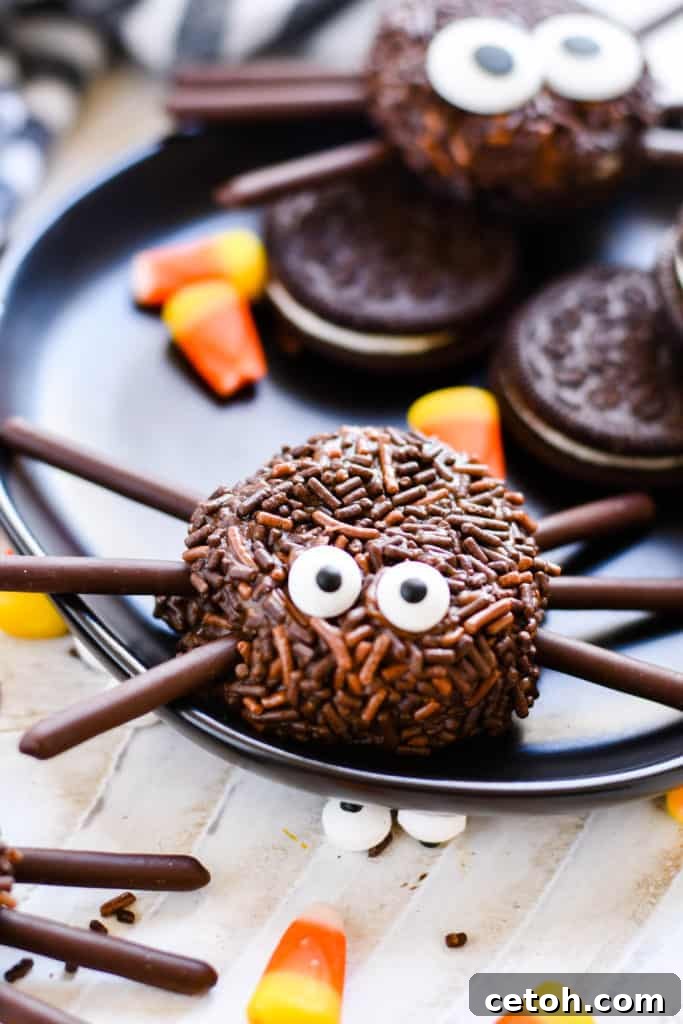
Imagine the smiles on their faces as they transform humble Oreos into adorable (and slightly spooky) spiders using just a few common ingredients: creamy chocolate frosting, crunchy Pocky sticks for legs, and playful candy eyes. This recipe isn’t just about making a treat; it’s about crafting memories and celebrating the festive spirit of Halloween without the stress of ovens or complex techniques. Whether you’re a seasoned baker or a kitchen novice, these no-fuss spider cookies are a fantastic way to add a touch of handmade magic to your holiday celebrations.
Why These No-Bake Spider Cookies Are a Halloween Must-Have
When it comes to Halloween entertaining, simplicity and charm are key. These Easy Halloween Spider Cookies tick all the boxes, making them an absolute must for your seasonal repertoire:
- Effortlessly Easy: The biggest draw is that these are entirely no-bake! No oven required means less cleanup and more time for spooky fun.
- Kid-Friendly Fun: This recipe is perfect for involving children of all ages. From spreading frosting to placing candy eyes, there are steps for every skill level, fostering creativity and fine motor skills.
- Irresistibly Delicious: Who can resist the classic combination of Oreo cookies and rich chocolate frosting? It’s a crowd-pleasing flavor profile that appeals to both kids and adults.
- Quick Assembly: In under 30 minutes, you can have a whole platter of these creepy-crawly delights ready to impress. Ideal for last-minute party preparations!
- Visually Striking: The contrast of the dark cookie “body” with the playful candy eyes and stick legs creates a truly eye-catching treat that embodies the Halloween spirit.
- Budget-Friendly: Made with readily available and inexpensive ingredients, these cookies are a cost-effective way to create a memorable holiday treat.
Forget the stress of elaborate desserts and embrace the joy of creating something truly special with minimal effort. These spider cookies are not just a treat; they’re an experience.
Related Recipes for More Halloween Fun:
- Spider Halloween Cupcakes
- Halloween Candy Apples
- White Chocolate Oreo Balls
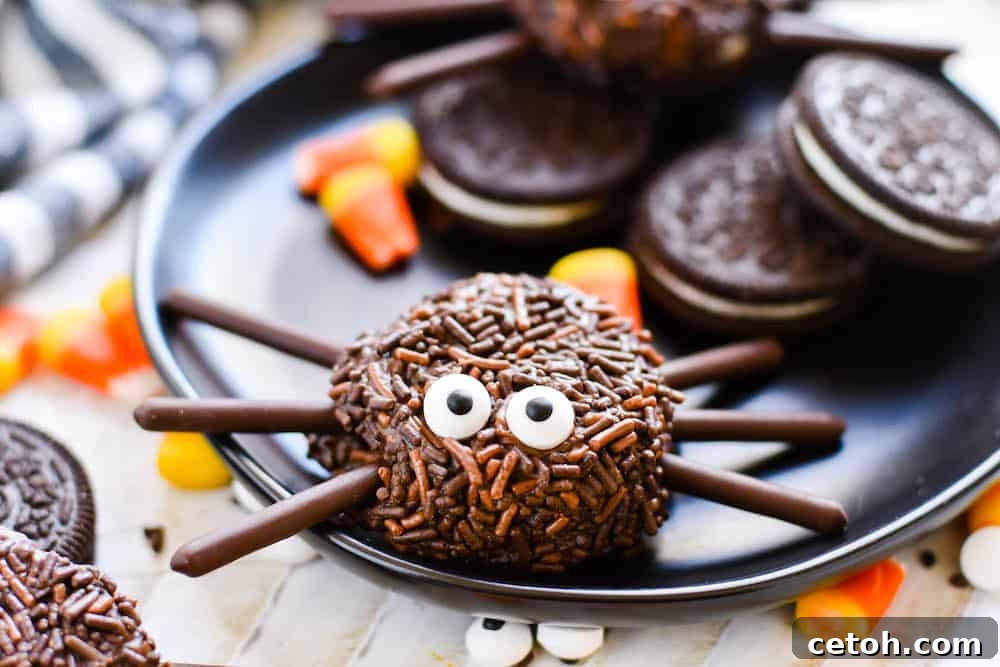
Gather Your Ingredients for Spooky Sweetness
Creating these charming spider cookies requires only a handful of easily accessible ingredients. The beauty of this recipe lies in its simplicity and the delightful synergy of textures and flavors. Here’s a closer look at what you’ll need and why each component is essential for crafting the perfect Halloween treat:
- Oreos (at least Double Stuf, but Mega Stuf is even better): The foundation of our spider! Opting for Double Stuf or Mega Stuf Oreos is crucial because the extra cream filling acts as a natural “glue” when you reassemble the cookie, providing a sturdier base for your spider and helping to hold the frosting and sprinkles in place. The classic chocolate flavor is also a perfect base for our creepy-crawly creatures.
- Chocolate Pocky Sticks: These thin, crispy biscuit sticks coated in chocolate are the ideal choice for spider legs. Their slender shape and snapping texture mimic realistic spider legs, and their chocolate coating perfectly complements the Oreo and frosting. If Pocky sticks aren’t available, thin pretzel sticks or even black licorice laces cut to size can serve as alternatives, though Pocky offers that unique crunch.
- Chocolate Jimmy Sprinkles: These tiny chocolate strands add a wonderful textural element and further enhance the chocolate theme. They create a “furry” or “fuzzy” effect around the spider’s body, adding to its authentic (and adorable) creepy appearance. Don’t underestimate the visual impact of a good sprinkle coating!
- Chocolate Frosting: The ultimate adhesive and flavor enhancer! A good quality store-bought chocolate frosting (or homemade, if you prefer) is essential for holding the cookie halves together, providing a sticky base for the sprinkles, and securing the candy eyes and Pocky stick legs. Its rich flavor ties all the chocolate elements together seamlessly.
- Candy Eyes: The pièce de résistance! These edible candy eyes are what truly bring your spiders to life, giving them their quirky, charming, and slightly spooky personality. They are widely available in baking aisles, especially around holidays. The more eyes you add, the more whimsical your spiders will look!
With these ingredients at the ready, you’re just moments away from creating a batch of Halloween magic!
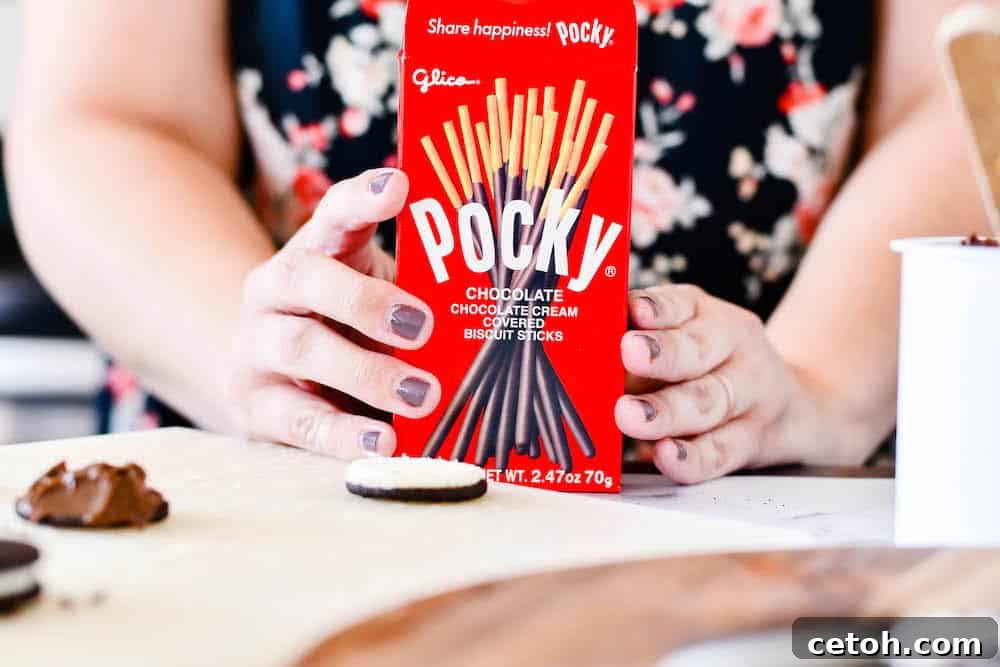
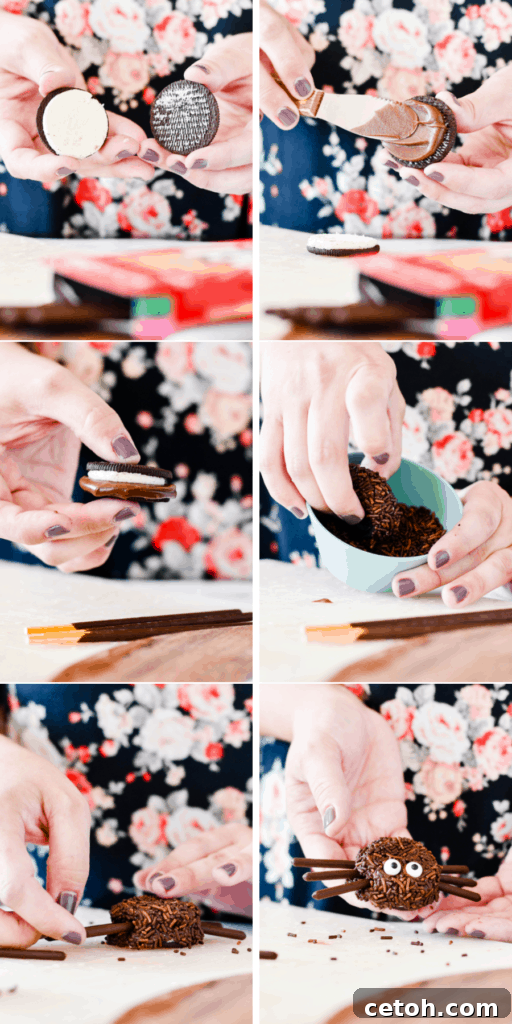
Step-by-Step Guide: Weaving Your Web of Delicious Spider Cookies
Now that you have all your ingredients, it’s time for the fun part: assembling your creepy-cute spider cookies! This process is designed to be simple and enjoyable, especially when little hands are helping. Follow these detailed steps to create your perfect Halloween treats:
- Prepare Your Oreo Base: Gently twist apart each Oreo cookie, separating it into two halves. You’ll want to ensure that most of the cream filling stays on one half – this will be your primary base. On the half with the cream, spread a thin, even layer of chocolate frosting over the exposed cream. This adds an extra layer of flavor and acts as a strong adhesive.
- Reassemble and Squeeze: Carefully place the other half of the Oreo cookie (the one without the cream or with minimal cream) directly on top of the frosting-covered half. Gently press down. You want to apply just enough pressure so that a small, visible ring of chocolate frosting subtly squeezes out from the edges of the cookie. This “ooze” is intentional and creates the perfect sticky surface for the next step.
- Roll in Sprinkles for “Fur”: Once the frosting is peeking out, immediately roll the entire edge of the cookie in your chocolate jimmy sprinkles. The frosting that squeezed out will act as a magnet, ensuring the sprinkles adhere beautifully, creating a charming, fuzzy texture around your spider’s body. Press gently to ensure a good coating all around.
- Top Coat of Sprinkles (Optional but Recommended): For an even more decadent and textured spider, spread a little more chocolate frosting on the very top surface of the reassembled cookie. Then, gently press the frosted top portion into the chocolate jimmies. This step ensures that sprinkles aren’t just on the sides but also create a delightful chocolatey “shell” over the top of your spider’s body, making it look extra delicious and complete.
- Crafting the Spider Legs: Take your chocolate Pocky sticks. For each spider, you’ll need 6 “legs.” Carefully break or cut 6 Pocky sticks in half. Discard or snack on the bottom halves (the plain biscuit part), as we’ll only be using the chocolate-coated top halves for the legs. Gently insert the cut ends of these 6 Pocky halves into the sides of the Oreo cookie, three on each side, arranging them to mimic the look of spider legs. Be gentle to avoid breaking the cookie.
- Adding the All-Important Eyes: The final touch to bring your spiders to life! Dab a tiny dot of chocolate frosting onto the back of each candy eye. Then, carefully press two (or more, for a super cute, buggy look!) of these frosted eyes onto the top of the Oreo cookie, just above where the legs begin. The frosting will securely hold them in place, giving your spider its adorable personality.
- Chill for Firmness: Once all your spiders are assembled, arrange them on a plate or baking sheet. Place the treats in the refrigerator for at least 15-30 minutes. This chilling time is crucial as it allows the chocolate frosting to firm up, ensuring that all the spider parts—the sprinkles, legs, and eyes—are securely in place and won’t detach when handled or served.
And there you have it – a whole colony of charming, delicious, and easy-to-make Halloween spider cookies, ready to be devoured!
Pro Tips for Perfect Halloween Spider Cookies
To ensure your spider cookies are not just delicious but also perfectly presented and easy to make, consider these helpful tips:
- Choose the Right Oreos: As mentioned, Double Stuf or Mega Stuf Oreos are highly recommended. The extra cream filling provides more stability and a better surface for the frosting to adhere to, making assembly smoother.
- Work Smart with Frosting: Use a small offset spatula or a butter knife for spreading frosting. Keep a damp cloth nearby to wipe off any excess frosting from your tools or fingers, ensuring a clean finish.
- Pocky Stick Precision: When cutting Pocky sticks, a sharp knife can help achieve a cleaner break. If working with children, pre-cut the Pocky sticks for them to prevent breakage and ensure even lengths.
- Chill Time is Crucial: Do not skip the refrigeration step! It’s vital for the frosting to set properly, ensuring your spider cookies hold their shape and stay intact during transport and serving.
- Make Ahead: These cookies can be made 1-2 days in advance. Store them in an airtight container in the refrigerator. This allows you to prepare for your Halloween festivities without last-minute rush.
- Involve the Kids Safely: Assign age-appropriate tasks. Younger children can help with sprinkling and placing candy eyes. Older children can assist with spreading frosting and gently inserting Pocky legs. Always supervise when using knives.
- Room Temperature Frosting: Ensure your chocolate frosting is at a good spreadable consistency. If it’s too cold, it might be stiff; if too warm, it might be too runny. A quick stir can often get it to the right consistency.
Creative Variations to Customize Your Spiders
While the classic chocolate spider cookie is delightful, feel free to get creative and customize your batch with these fun variations:
- Different Cookie Bases: Experiment with other Oreo flavors like Peanut Butter Oreos, Mint Oreos, or even Golden Oreos. Adjust the frosting flavor accordingly (e.g., peanut butter frosting with peanut butter Oreos).
- Alternative “Legs”: If Pocky sticks are unavailable or you want a different look, try using thin pretzel sticks (for a salty-sweet crunch), black licorice laces, or even dark chocolate covered pretzel sticks for a sturdier leg.
- Colorful Sprinkles: Instead of plain chocolate jimmies, use a mix of Halloween-themed sprinkles (orange, purple, black) for a more vibrant spider. You could also use shredded coconut dyed green for a “hairy” monster look!
- Web Decorations: For an extra artistic touch, pipe thin lines of white frosting in a web pattern on your serving platter before arranging the spiders. You can also pipe a small “web” onto the top of some cookies.
- Ghostly Spiders: Use Golden Oreos and white frosting. Add the black Pocky legs and candy eyes for a lighter, more “ghostly” spider effect.
- Peanut Butter Spiders: Substitute chocolate frosting with peanut butter frosting (or a mix of peanut butter and chocolate) for a rich, nutty flavor profile.
Serving and Storing Your Spooky Creations
Once your Easy Halloween Spider Cookies are chilled and ready, they’re perfect for a variety of occasions:
- Halloween Party Platter: Arrange them on a spooky-themed platter alongside other Halloween treats. They make a fantastic centerpiece due to their unique appearance.
- School Treats: These are a hit at school parties or as a special lunchbox surprise during the Halloween season. Just ensure they stay cool if transporting.
- Family Movie Night: Elevate a cozy Halloween movie night with these fun snacks that are easy to grab and enjoy.
- Edible Gifts: Package a few in a decorative Halloween bag or box for a thoughtful homemade gift for friends, neighbors, or teachers.
Storage: Store the finished spider cookies in an airtight container in the refrigerator for up to 3-5 days. The chilling helps maintain their structure and keeps the frosting firm, ensuring all the delightful “spider parts” stay perfectly in place. If stacking, place parchment paper between layers to prevent sticking.
Frequently Asked Questions About Easy Halloween Spider Cookies
Here are answers to some common questions you might have about making these fun Halloween treats:
- Can I make these spider cookies ahead of time?
- Absolutely! These cookies are perfect for making 1-2 days in advance. Store them in an airtight container in the refrigerator, and they’ll be fresh and ready for your Halloween event.
- What if I can’t find Pocky sticks?
- No problem! Thin pretzel sticks (either plain or dipped in melted chocolate), black licorice laces, or even small pieces of dark chocolate covered pretzel rods make great alternatives for the spider legs. Just ensure they are thin enough to insert without breaking the cookie.
- Are these spider cookies suitable for those with dietary restrictions?
- The traditional recipe uses Oreos, which contain wheat and dairy. However, many brands now offer gluten-free and vegan sandwich cookies that can be used as a substitute. Be sure to also check that your chocolate frosting, Pocky sticks, and candy eyes are suitable for your specific dietary needs.
- How many cookies does this recipe make?
- The recipe quantity isn’t specified in the original, but typically, a standard package of Oreos contains about 36 cookies. This would yield 18 spider cookies (since each spider uses two halves). You can easily scale the ingredients up or down depending on how many you need.
- How long do the spider cookies last?
- When stored properly in an airtight container in the refrigerator, these spider cookies will stay fresh and delicious for about 3 to 5 days. The texture of the Oreo might soften slightly over time, but they’ll still be enjoyable.
- Can I use a different type of frosting?
- Yes, while chocolate frosting works best for the spooky aesthetic and flavor, you can certainly experiment. Vanilla frosting (perhaps tinted black or purple with food coloring), cream cheese frosting, or even peanut butter frosting would be delicious, but may alter the overall look.
Unleash Your Inner Halloween Decorator!
Creating these Easy Halloween Spider Cookies is more than just following a recipe; it’s an opportunity to embrace the playful spirit of the season. They’re a testament to how simple ingredients and a dash of creativity can transform into something truly memorable and enchanting. Whether you’re aiming for spooky, silly, or simply sweet, these no-bake treats are wonderfully versatile and always a crowd-pleaser.
So, gather your supplies, call upon your little helpers, and let the Halloween magic begin in your kitchen. These spider cookies are not just desserts; they’re invitations to laughter, shared moments, and the joy of creating something together. We hope this expanded guide helps you craft the most delightful and easy Halloween spider cookies yet!