
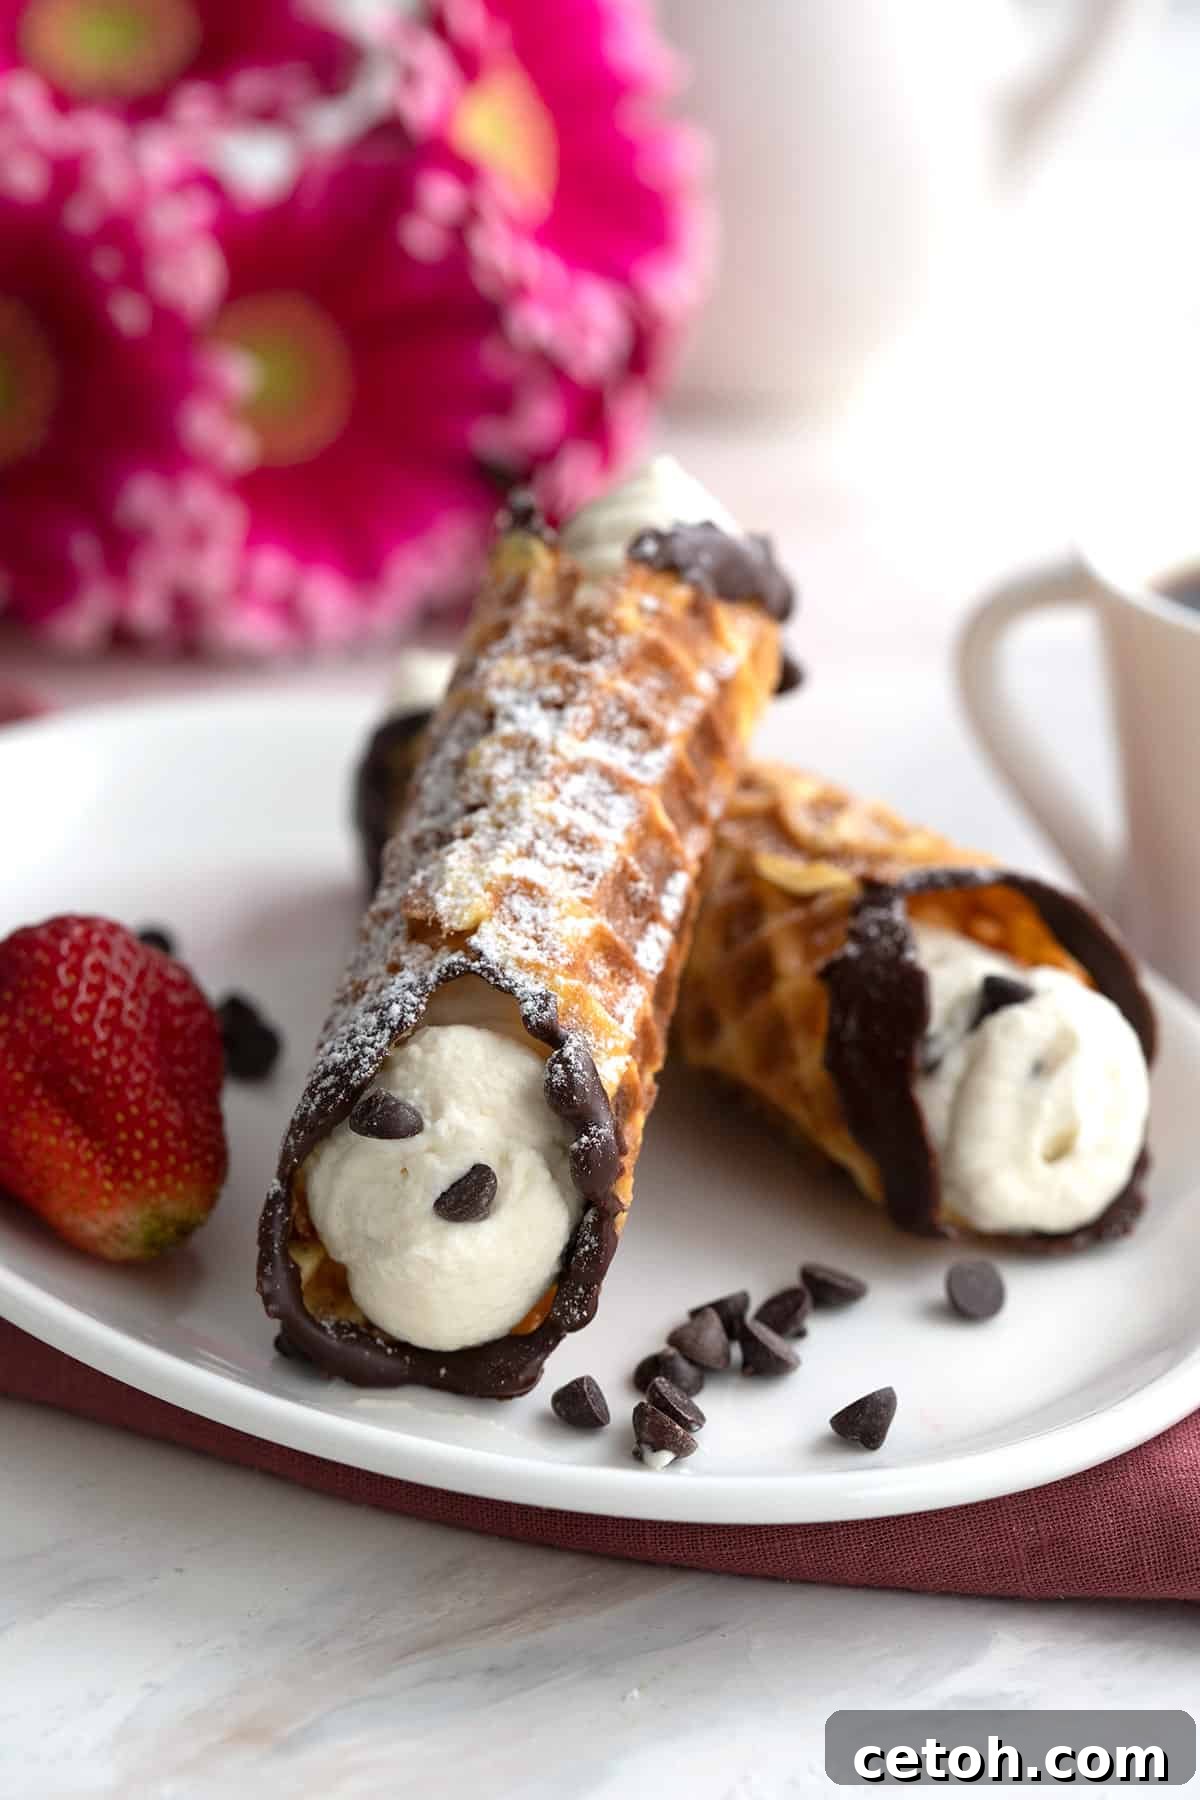
Welcome to the world of guilt-free indulgence! These exquisite Keto Cannoli are a testament to how utterly delicious sugar-free and low-carb desserts can be. With their perfectly crisp outer shells and luxuriously rich, creamy centers, they’re designed to satisfy your deepest dessert cravings without derailing your ketogenic lifestyle. Whether you’re celebrating a special occasion, looking for a unique holiday treat, or simply desiring a sweet reward at the end of a long day, these homemade keto cannoli offer a delightful experience any time of the year. Forget the complex, deep-fried traditional versions; this recipe simplifies the process dramatically, bringing the authentic taste of Italy right to your keto-friendly kitchen.
Beyond the Craving: My Journey to Perfect Keto Cannoli
For too long, the idea of enjoying a classic cannoli on a ketogenic diet felt like an impossible dream. Traditional cannoli, with their wheat-based fried shells and sugar-laden fillings, are far from keto-compliant. However, the culinary world of low-carb living is full of surprises, and my journey to creating these easy Keto Cannoli proved to be one of the most rewarding. It all started with an update to my Keto Pizzelle recipe. As those delicate pizzelle cookies came off the iron, their initial flexibility struck me. They were soft enough to be shaped before crisping up as they cooled, maintaining their form. This characteristic sparked an idea: could these versatile pizzelle serve as the perfect, no-fry shells for a keto-friendly cannoli?
The thought was revolutionary. I quickly acquired some cannoli forms, eager to test this theory. To my immense delight, the pizzelle shells not only worked but exceeded all expectations! This discovery transformed what once seemed like an arduous, time-consuming task into a wonderfully simple and enjoyable baking adventure. The result is a crisp, light shell that beautifully mimics its traditional counterpart, all without the mess and added carbs of deep frying. This method makes it possible for everyone to enjoy this iconic Italian dessert, even on a strict keto regimen, proving that you don’t have to sacrifice flavor or experience when eating low-carb.
Why These Keto Cannoli Will Become Your Go-To Dessert
If you’re searching for a dessert that marries elegance with simplicity and fits perfectly into your low-carb lifestyle, look no further. These low-carb cannoli are more than just a sweet treat; they’re a revelation. The satisfaction of biting into a crisp shell that gives way to a velvety, rich cream filling is truly unparalleled. What makes these sugar-free cannoli particularly special is their ingenious design:
- No Frying Required: Unlike traditional cannoli which demand deep frying, these keto versions utilize easy-to-make pizzelle cookies for their shells. This not only simplifies the cooking process but also makes them a lighter option without sacrificing that essential crunch.
- Irresistibly Creamy Filling: The heart of any great cannoli is its filling, and this keto-friendly cream is nothing short of spectacular. A harmonious blend of drained ricotta and mascarpone, sweetened with a powdered sugar substitute, creates a smooth, decadent texture that is both rich and surprisingly light.
- Guilt-Free Indulgence: At just 2g net carbs per cannoli, you can savor every bite without an ounce of guilt. This makes them an ideal dessert for those following a ketogenic diet, allowing you to enjoy a classic Italian delicacy while maintaining your dietary goals.
- Customizable & Versatile: From a simple dusting of powdered sweetener to decadent chocolate-dipped ends or a sprinkle of chopped nuts, these cannoli offer endless possibilities for customization. They are perfect for holiday gatherings, special celebrations, or simply as an elevated everyday treat.
- Effortless Preparation: While they look sophisticated, the actual process of making these keto cannoli is surprisingly straightforward. Once you have your pizzelle shells ready, the filling comes together quickly, making this a rewarding recipe even for novice bakers.
Embrace the joy of a truly delicious, keto-compliant dessert that’s easy to make, delightful to eat, and a fantastic conversation starter.
Essential Ingredients for Your Keto Cannoli Masterpiece
Crafting the perfect Keto Cannoli requires a thoughtful selection of ingredients, each playing a crucial role in achieving that signature crisp shell and luscious cream filling. Here’s what you’ll need and why:
- Keto Pizzelle Batter: This forms the foundation of our innovative, no-fry shells. You’ll need just half a batch of my tried-and-tested keto pizzelle batter. This typically consists of eggs, a keto-friendly sweetener, finely ground almond flour, butter, baking powder, and a pinch of salt. The almond flour ensures a low-carb profile, while the butter and eggs provide richness and structure, allowing the pizzelle to become wonderfully crisp once cooled.
- Ricotta Cheese: The cornerstone of any authentic cannoli filling. It’s imperative to use full-fat ricotta for the best flavor and texture. The most critical step with ricotta is draining it thoroughly for at least three hours, or even overnight. Ricotta naturally holds a lot of moisture, and removing this excess water is key to achieving a thick, stable, and perfectly scoopable cannoli cream that won’t make your shells soggy. The drier the ricotta, the richer and firmer your filling will be.
- Mascarpone Cheese: This incredibly soft and creamy Italian cheese adds an extra layer of richness and a silky texture to the filling. Its high-fat content contributes to the luxurious mouthfeel of the cannoli cream. If mascarpone is not readily available, a good quality, softened cream cheese can be used as an excellent substitute, providing similar creaminess and structure.
- Powdered Sweetener: For the optimal texture and sweetness without the sugar, a powdered sugar substitute is essential. I highly recommend using Swerve Confectioners or a similar erythritol-based powdered sweetener. Powdered sweeteners dissolve smoothly into the cream, preventing any grainy texture. While other sweeteners like allulose work, be aware that allulose can sometimes make fillings a bit softer, which might affect the desired consistency of the cannoli cream.
- Vanilla Extract: A touch of pure vanilla extract is indispensable for enhancing the overall flavor profile of the cream. It adds a warm, aromatic note that complements the richness of the cheeses beautifully, bringing out that classic cannoli taste.
- Heavy Whipping Cream: To lighten the filling and give it an airy, yet structured consistency, a portion of whipped heavy cream is gently folded in. Whipping the cream until it holds stiff peaks incorporates air, resulting in a delightfully fluffy and less dense cannoli cream that still holds its shape perfectly within the shells.
- Optional Garnishes: The finishing touches truly elevate your keto cannoli. Consider dipping the ends of your finished shells in melted sugar-free dark chocolate for an elegant touch. Alternatively, mini sugar-free chocolate chips or finely chopped nuts (like pistachios or almonds) pressed into the ends of the filling add both visual appeal and a delightful textural contrast. A light dusting of powdered sweetener just before serving completes the look.
Step-by-Step: Crafting Your Delicious Keto Cannoli
Making these keto cannoli is a process that’s both enjoyable and straightforward, especially with the clever use of pizzelle shells. Follow these detailed steps to create a dessert that will impress everyone:
1. Prepare the Pizzelle Shells: Begin by preparing the keto pizzelle batter according to its recipe directions. Ensure your pizzelle press is heated to the correct temperature and very lightly greased to prevent sticking. Scoop the batter onto the center of the press and cook until golden and crisp, following the specific cooking times for your pizzelle maker. The key here is to work quickly in the next step.
2. Form the Cannoli Shells: Immediately as each pizzelle comes off the hot press, it will be pliable. While it’s still warm and flexible, carefully yet quickly roll it around a cannoli mold. Wrap it tightly to ensure a perfect tube shape. Place the formed shell, seam-side down, on a baking rack to cool completely. As they cool, the pizzelle will firm up and become wonderfully crisp, holding their new cannoli shape. This cooling process is crucial for achieving that desired crunch.
3. Prepare the Ricotta (Draining is Key): This step is vital for a thick, luxurious filling. Line a fine-mesh sieve with several layers of cheesecloth or a few sheets of paper towel. Place the ricotta in the lined sieve, set it over a bowl, and allow it to drain in the refrigerator for at least three hours. For an even thicker cream, you can drain it overnight. The more moisture you remove, the richer and more stable your cannoli cream will be.
4. Craft the Cannoli Cream: In a large mixing bowl, combine the thoroughly drained ricotta and softened mascarpone cheese. Beat them together with an electric mixer for about 2 minutes on medium speed until the mixture is perfectly smooth and well combined, with no lumps. Next, add the powdered sweetener and vanilla extract, beating again until fully incorporated and the mixture is light and fluffy.
5. Whip the Heavy Cream: In a separate, chilled bowl, beat the heavy whipping cream until it forms stiff peaks. Be careful not to overbeat, as it can turn grainy. The whipped cream adds lightness and structure to the filling.
6. Fold & Combine: Gently fold the whipped heavy cream into the ricotta and mascarpone mixture. Use a spatula to combine them with light, upward motions, preserving the airy texture of the whipped cream. Mix just until no streaks of white remain.
7. (Optional) Chocolate Dipped Ends: If you plan to dip the ends of your cannoli in chocolate, this is the time to do it, *before* filling them. Melt about 1 ½ ounces of sugar-free chocolate (dark chocolate chips work wonderfully) in a double boiler or microwave. Dip each end of the cooled cannoli shells into the melted chocolate, allowing any excess to drip off. Place them on a baking sheet lined with waxed paper and refrigerate for about 20 minutes to allow the chocolate to set firmly.
8. Fill the Shells: Transfer the prepared cannoli cream into a piping bag fitted with a wide tip. Pipe the filling into one end of a cannoli shell, filling it about halfway, then pipe from the other end until the shell is completely full. If you don’t have a piping bag, a small spoon can also be used, though a piping bag offers a cleaner and more professional finish.
9. Garnish and Serve: For an extra touch, press mini sugar-free chocolate chips or finely chopped nuts (like pistachios or almonds) into each end of the filled cannoli. Finally, lightly dust the finished cannoli with additional powdered sweetener for presentation and an extra hint of sweetness. Serve immediately for the best crispness!
Pro Tips for Flawless Keto Cannoli & FAQs
Achieving truly perfect Keto Cannoli is easy with a few expert tips. This section combines essential advice with answers to common questions, ensuring your dessert is nothing short of spectacular.
The Importance of Draining Ricotta
One of the most crucial steps in making exceptional cannoli cream is properly draining the ricotta cheese. Ricotta naturally contains a significant amount of moisture, and if not removed, this excess liquid can result in a thin, watery filling that will quickly soften your crisp shells. To ensure a thick, stable, and richly textured cream, always line a fine-mesh sieve with cheesecloth or several layers of paper towel. Place the ricotta in the lined sieve and let it drain over a bowl in the refrigerator for a minimum of 3 hours. For best results, consider letting it drain overnight. The drier the ricotta, the more luxurious your filling will be.
Ensuring Crispy Shells
The hallmark of a great cannoli is its crisp shell. Since these keto shells are made from pizzelle cookies, their crispness is vital. If, after cooling, your cannoli shells aren’t as crisp as you’d like, or if they’ve softened due to humidity, don’t fret! You can easily re-crisp them. Simply place the unfilled shells in a warm oven (around 200ºF or 95ºC) for 10 to 15 minutes. Allow them to cool completely on a wire rack afterward. They will emerge beautifully crisp and ready for filling.
Make-Ahead & Storage Solutions
Cannoli, by nature, tend to soften over time as the moisture from the creamy filling leeches into the delicate shell. For this reason, it’s best to fill the shells just before serving to maintain maximum crispness. However, both the shells and the filling can be prepared in advance:
- Shells: Store unfilled pizzelle cannoli shells in an airtight container at room temperature for up to 5 days. You can also freeze them for longer storage.
- Filling: Prepare the cannoli cream and store it in an airtight container in the refrigerator for up to 3-4 days. When ready to serve, give it a quick whisk to re-fluff before piping.
Only fill the number of shells you anticipate serving to ensure peak freshness and crunch.
Flavor Variations and Garnishes
While classic vanilla is wonderful, feel free to experiment with your cannoli cream:
- Citrus Zest: Add a teaspoon of finely grated orange or lemon zest to the filling for a bright, refreshing note.
- Spices: A pinch of cinnamon or nutmeg can add warmth and depth.
- Espresso Powder: For coffee lovers, a small amount of instant espresso powder mixed into the cream creates a subtle mocha flavor.
- Nuts: Beyond dipping, you can fold finely chopped pistachios, almonds, or walnuts directly into the filling for added texture.
Classic cannoli are traditionally filled with a sweet and creamy ricotta cheese mixture. In the case of these keto cannoli, we combine drained ricotta with mascarpone cheese to provide an even richer taste and more stable structure. This is then sweetened with a powdered low-carb sweetener and flavored with vanilla extract. For extra flair, you can stir in sugar-free chocolate chips or chopped nuts, or simply decorate the ends of the cannoli with these delicious additions.
Conventional cannoli made with wheat flour and refined sugar typically contain around 20g of carbohydrates per serving, making them unsuitable for a ketogenic diet. However, these specially crafted keto cannoli dramatically reduce the carb count. Each serving has only 3g of total carbs and 1g of fiber, resulting in an impressive net carb count of just 2g per cannoli. This allows you to indulge in this delightful dessert without compromising your low-carb lifestyle.
Related Low-Carb Dessert Recipes
If you loved these Keto Cannoli, be sure to explore more of our delicious low-carb and sugar-free dessert creations. From crisp cookies to decadent cakes, we have a variety of recipes that will help you maintain your keto lifestyle without sacrificing flavor.
Keto Cannoli Recipe
Equipment
Ingredients
Shells
- 1/2 recipe Keto Pizzelle
Cannoli Cream
- 8 ounces (226.8 g) ricotta, drained (see notes)
- 8 ounces (226.8 g) mascarpone cheese, softened, can sub cream cheese
- 2/3 cup (121.33 g) Swerve Confectioners
- 1 tsp vanilla extract
- 3/4 cup (178.5 g) heavy whipping cream
Garnish
- dark chocolate chips, sugar-free
- mini sugar-free chocolate chips
- chopped nuts
Instructions
Cannoli Shells
-
Prepare the batter according to the directions in the recipe. Heat the pizzelle press and grease very lightly. Scoop the batter into the press and cook as directed.
-
As each pizzelle comes off the press, quickly roll it around a cannoli mold while it’s still hot. Wrap it tightly and place it seam-side down on a baking rack. Let cool completely (they will continue to crisp up as they cool).
-
In a large bowl, beat the ricotta and mascarpone together for 2 minutes, until well combined and smooth. Then beat in the sweetener and vanilla extract.
Filling
-
In another bowl, beat the whipping cream until it holds stiff peaks. Gently fold into the ricotta mixture.
-
Pipe the filling into one end of the shells, filling halfway, then pipe into the other end. You can also spoon it in with a small spoon.
Garnish
-
If you plan on dipping the ends in chocolate, you need to do this before you fill them with cannoli cream. Melt about 1 1/2 ounces of sugar-free chocolate and dip the ends of the cooled shells in the chocolate. Set on a waxed paper lined baking sheet. Refrigerate 20 minutes to set.
-
You can also add mini chocolate chips or chopped nuts to the ends of the filling. Dust the finished cannoli lightly with powdered sweetener.
Notes
Draining the ricotta: Line a sieve with some cheesecloth or paper towel and let the moisture drain off for at least 3 hours. You can even leave it overnight.
To make ahead: You can make the shells and the cream a day or two in advance, but don’t fill them until you are ready to serve, as they tend to soften as they sit. Store the shells in a covered container on the counter, and store the cream filling in the fridge. They should both be good for up to 5 days.
If the shells become soft from humidity in the environment, re-crisp them by placing them in a 200ºF oven for 5 to 10 minutes. Then let them cool completely again.
Nutrition
I’d love to know your thoughts, leave your rating below!