
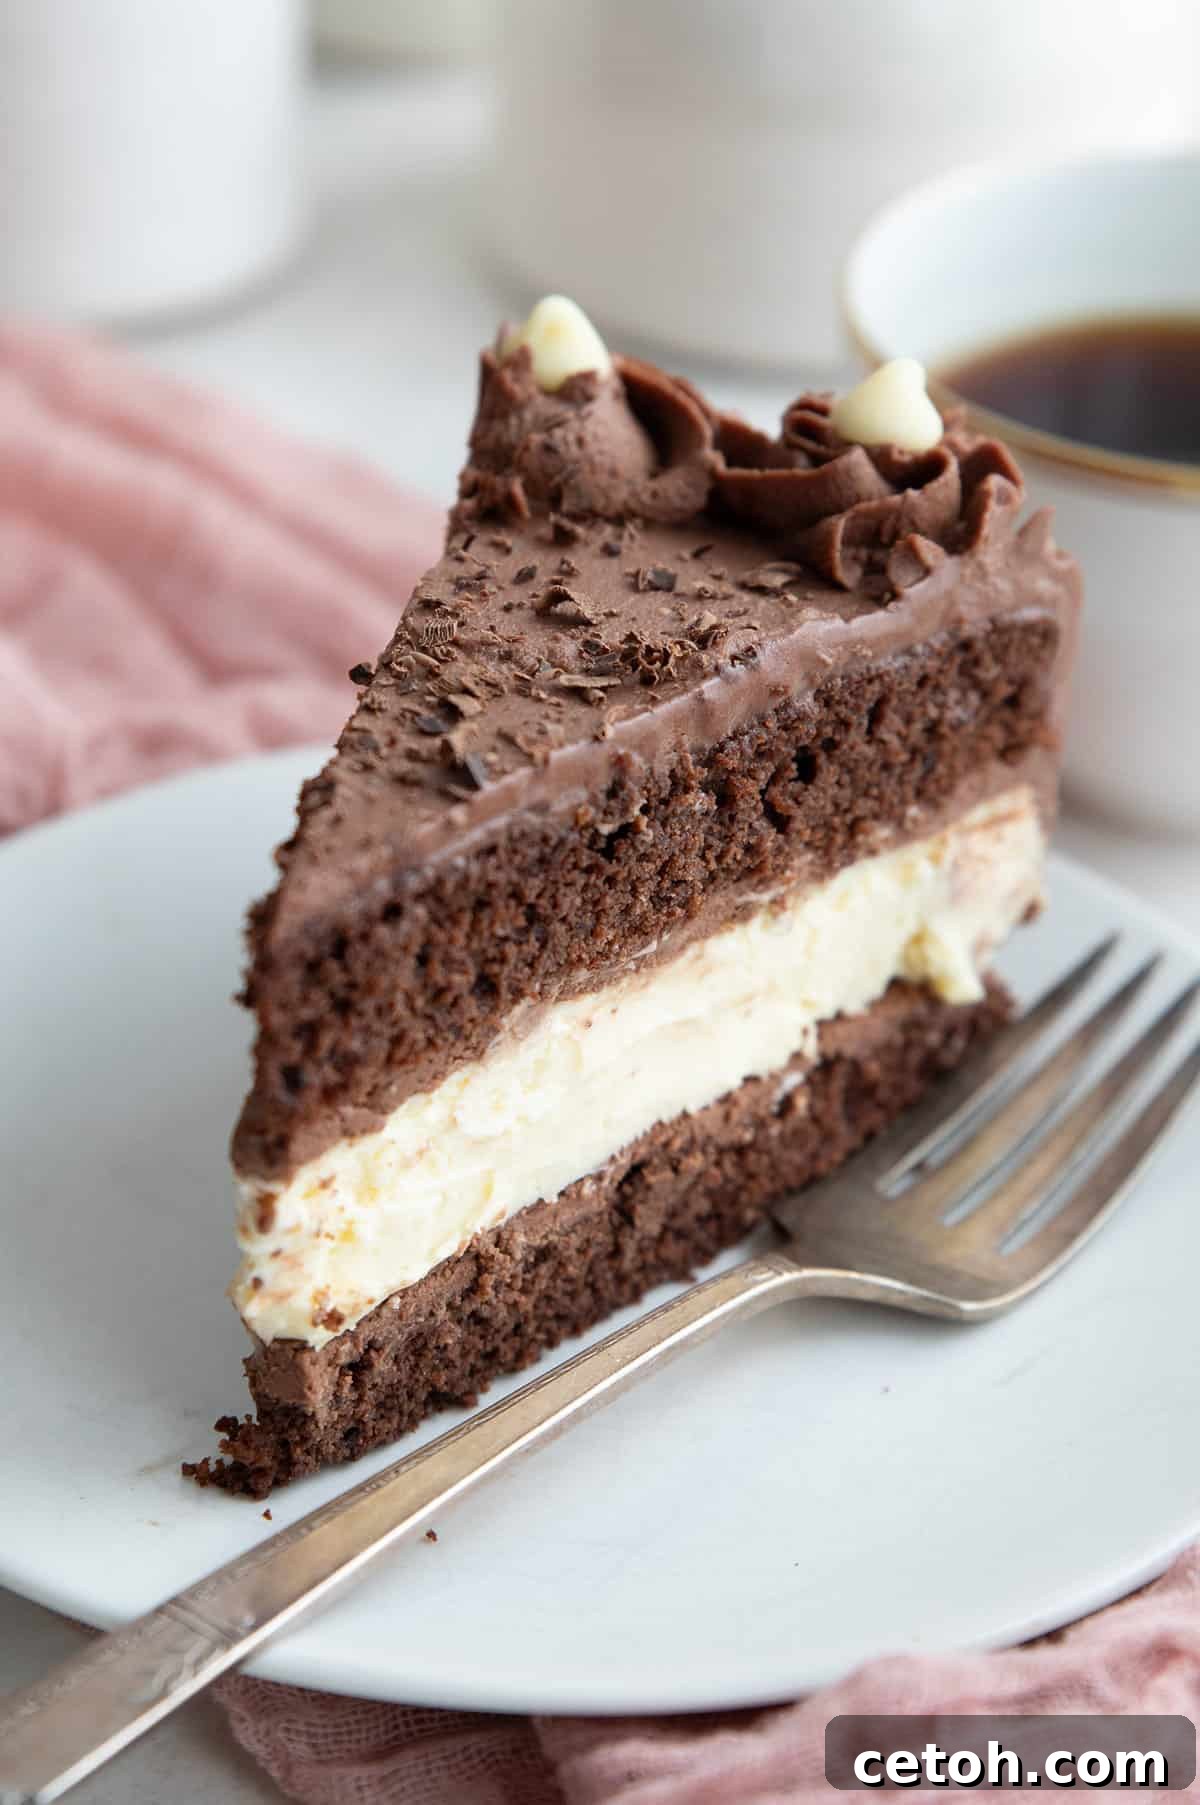
Get ready, keto enthusiasts! Prepare your kitchens for an unparalleled culinary adventure, because this Low Carb Chocolate Cheesecake Cake is not just a dessert—it’s an experience. Imagine layers of rich, moist chocolate coconut flour cake lovingly cradling a luscious, creamy core of authentic keto cheesecake. Each bite delivers a harmonious blend of deep chocolate and tangy sweet vanilla, all without the sugar. This isn’t just a recipe; it’s the ultimate indulgence for anyone following a ketogenic lifestyle, proving that you don’t have to compromise on flavor or decadence.
As many of you know, March marks my birthday, a personal tradition that involves me baking my very own keto birthday cake. While some might suggest I let someone else take the reins, for me, it’s an annual ritual of joy and creation. There’s a profound satisfaction in meticulously planning, preparing, and assembling each component, transforming simple ingredients into a spectacular celebration. It’s a moment of mindful baking, a cherished time dedicated to crafting something truly special.
And let’s be honest, when it comes to sugar-free baking, few can match the precision and passion I pour into my creations. Every year presents a new challenge, a fresh opportunity to innovate within the low-carb framework. Two years ago, for my 50th, I perfected what I still consider the world’s best keto chocolate blackout cake. The year prior, a magnificent triple-layer keto carrot cake stole the show. Even the beloved Keto Italian Cream Cake was born from one of these cherished birthday baking sessions. This year, I truly believe I’ve outdone myself. I went bold, I went big, and I crafted the most decadently delicious Keto Cheesecake Cake. A complete, creamy cheesecake nestled within two layers of rich chocolate cake, all crowned with the silkiest keto chocolate frosting? It’s a dessert philosophy I live by: go big or go home!
Crafting the Ultimate Keto Chocolate Cheesecake Cake
Let’s be transparent: this isn’t a 30-minute dessert. This Keto Cheesecake Cake is a multi-step baking extravaganza, a labor of love that is best spread over two days. But don’t let that deter you! While it requires a bit of patience and planning, each step is surprisingly straightforward and incredibly rewarding. The key to its structural integrity and melt-in-your-mouth texture lies in allowing the cheesecake layer to freeze solid before assembly. This crucial step prevents any “smooshing” and ensures a perfectly defined, stunning cross-section when you slice into it.
The foundation of this masterpiece is a pair of perfectly baked chocolate cake layers. For these, I’ve adapted my tried-and-true Keto Ding Dong Cake recipe, known for its superb flavor and ability to hold up beautifully to rich fillings. This coconut flour-based cake provides a moist, intensely chocolatey counterpoint to the creamy cheesecake. Once your cake layers are cooled and the cheesecake is frozen, the final flourish involves a generous spread of homemade chocolate frosting. This transforms the individual components into a cohesive, spectacular layer cake that will undoubtedly impress anyone fortunate enough to try a slice. I shared this creation with my friends, and the rave reviews confirmed what I already knew: this cake is a showstopper.
Essential Ingredients for Your Keto Masterpiece
- Cream Cheese: The star of any cheesecake, and a key component in our rich chocolate frosting. Ensure it’s fully softened to achieve that irresistibly smooth, lump-free texture.
- Sour Cream: This adds an incredible depth and a luscious, velvety mouthfeel to the cheesecake filling. If you don’t have sour cream on hand, heavy whipping cream makes a suitable alternative.
- Sweetener: You’ll need both granular sweetener for the cake and cheesecake (allulose or erythritol work wonderfully, with allulose preferred for cheesecake to prevent recrystallization), and powdered sweetener for the silken frosting.
- Eggs: Always use room-temperature eggs for better incorporation into batters and fillings, leading to a smoother, more even texture.
- Coconut Flour: Our chosen low-carb flour for the chocolate cake layers. It’s highly absorbent, so precise measurements are crucial. Refer to our “Tips for Success” for more details on flour alternatives.
- Cocoa Powder: For an intensely deep chocolate flavor and rich color, I highly recommend using Dutch-process cocoa powder. It makes a noticeable difference in the final taste.
- Protein Powder: An unsung hero in keto baking! Whether whey or plant-based, a couple of tablespoons provide structural stability, resulting in a lighter, fluffier cake that holds its shape beautifully. Avoid collagen protein for baking applications.
- Leftover Coffee: A secret weapon for enhancing chocolate flavors! A small amount of coffee won’t make your cake taste like coffee, but it will significantly deepen the chocolate notes. It’s optional; if you prefer, use water instead.
- Unsweetened Chocolate: Specifically, 100% unsweetened chocolate is vital for the frosting. It contributes a rich, complex chocolate flavor and a wonderfully creamy texture without adding any hidden sugars.
- Butter: Essential for the decadent frosting, combined with cream cheese for a luxurious spread. Ensure it’s softened to blend smoothly.
- Heavy Whipping Cream: Used in the frosting to achieve a perfectly smooth, spreadable consistency that isn’t too thick or heavy. Also, an alternative to sour cream in the cheesecake.
- Pantry Staples: Don’t forget baking essentials like avocado oil (or melted butter), pure vanilla extract, baking powder for lift, and a pinch of salt to balance and enhance all the sweet flavors.
Step-by-Step Guide to Baking Perfection
- Prepare the Cheesecake Batter: Begin by creaming the softened cream cheese until it’s incredibly smooth and airy. Gradually beat in the sour cream, followed by your chosen granular sweetener and vanilla extract, mixing until thoroughly combined. Gently incorporate the eggs one at a time, just until blended, making sure to scrape down the sides and bottom of the bowl after each addition to ensure a uniform batter.
- Bake the Cheesecake Layer: Pour the velvety cheesecake batter into a greased 8-inch round baking pan with a removable bottom. For easy release, line the bottom with parchment paper and grease it. Gently shake the pan side to side to level the surface, then tap it lightly on the counter to release any trapped air bubbles. Bake at 300ºF (150ºC) for 30 to 40 minutes, or until the edges are set, but the center still retains a slight jiggle. Remove from the oven and allow it to cool completely before proceeding.
- Freeze the Cheesecake: Once cooled, run a sharp knife around the perimeter of the cheesecake to loosen it, then carefully remove the sides of the pan. Tightly wrap the cheesecake layer in plastic wrap and place it in the freezer until it’s completely solid. This will take at least 3 hours, but overnight is ideal for best results. This step is crucial for easy handling during assembly.
- Prepare the Chocolate Cake Batter: In a large bowl, whisk together all the dry ingredients: coconut flour, granular sweetener, cocoa powder, protein powder, baking powder, and salt. In a separate bowl, combine the wet ingredients: eggs, avocado oil (or melted butter), and vanilla extract. Pour the wet mixture into the dry ingredients and stir until just combined. Gradually mix in the leftover coffee or water, about ¼ cup at a time, until the batter is thick yet easily scoopable.
- Bake the Cake Layers: Preheat your oven to 350ºF (175ºC). Generously grease two 8-inch round cake pans. Line the bottoms with parchment paper and grease the paper as well. Divide the chocolate cake batter evenly between the two prepared pans, spreading it out to the edges. Bake for 15 to 20 minutes, or until the cake tops spring back slightly when lightly touched. Remove from the oven and let them cool in the pans for a few minutes before loosening the edges and carefully inverting them onto a wire rack to cool completely.
- Melt the Chocolate (for Frosting): Place the chopped unsweetened chocolate in a microwave-safe bowl. Heat in 30-second intervals, stirring after each, until smooth and fully melted. Alternatively, you can melt the chocolate in a heat-proof bowl set over a pot of barely simmering water, stirring constantly. Once melted, set aside to cool to a lukewarm temperature.
- Prepare the Chocolate Frosting: In a large mixing bowl, beat the softened cream cheese and butter together until the mixture is incredibly smooth and light. Add the powdered sweetener and vanilla extract, beating until incorporated. Pour in the cooled melted chocolate and beat until a smooth, rich chocolate cream cheese mixture forms. Add two tablespoons of heavy cream and beat until well combined. In a separate, clean bowl, whip the remaining heavy cream until it forms stiff peaks. Gently fold the whipped cream into the chocolate cream cheese mixture until no streaks remain, creating a light, airy, and luscious frosting.
- Assemble the Cake – First Layer: Carefully place one cooled chocolate cake layer on your chosen serving platter or cake stand. Take about 1/3 cup of the prepared chocolate frosting and spread it evenly over the top of this cake layer, extending all the way to the edges.
- Assemble the Cake – Cheesecake Layer: Retrieve the solid frozen cheesecake layer from the freezer. Carefully invert it onto the frosted chocolate cake layer. Gently peel off any parchment paper that might be adhering to the bottom of the cheesecake. Spread another 1/3 cup of the chocolate frosting over the top of the cheesecake layer, ensuring it’s evenly distributed.
- Assemble the Cake – Final Layer & Decorate: Carefully place the second chocolate cake layer on top of the frosted cheesecake. Use the remaining chocolate frosting to generously cover the top and sides of the entire cake, creating a smooth, elegant finish. For a decorative touch, transfer any leftover frosting into a piping bag fitted with a star tip and pipe beautiful rosettes around the top edge of the cake. Your magnificent Keto Cheesecake Cake is now complete and ready to impress!
Expert Tips for Keto Baking Success
Achieving keto baking perfection, especially with a showstopper like this Keto Cheesecake Cake, involves a few key insights:
- Almond Flour Alternative: If you prefer baking with almond flour over coconut flour, you can substitute the chocolate cake layers with a modified version of my Keto Devil’s Food Cake recipe. You’ll need to reduce that recipe to approximately two-thirds of the original quantity to fit two 8-inch cake pans.
- The Right Pan for Cheesecake: For the cheesecake layer, a baking pan with a removable bottom is absolutely essential. While a standard springform pan often works, be aware that many are 9 inches in diameter. For an 8-inch cheesecake, consider pans specifically designed with removable bottoms, such as this one from ChefMade, or similar options from brands like Fat Daddio. This ensures effortless removal of your delicate cheesecake.
- Freeze Cheesecake Solid: This cannot be emphasized enough. For seamless assembly, the cheesecake layer must be frozen completely solid. This allows you to handle it without it losing its shape or squishing, ensuring clean, beautiful layers in your finished cake.
- Sweetener Selection: For both the cheesecake and the chocolate cake layers, granular allulose or erythritol are excellent choices. I personally favor allulose for cheesecake batters as it helps prevent any potential recrystallization that can sometimes occur with erythritol as the cheesecake cools. For the frosting, a powdered sweetener is crucial for a smooth texture; both powdered allulose and erythritol varieties will work perfectly.
- Ingredient Temperatures: Always ensure your cream cheese, butter, and eggs are at room temperature. This significantly aids in achieving a smooth, well-emulsified batter and frosting, preventing lumps and ensuring consistent texture throughout.
Frequently Asked Questions About Keto Cheesecake Cake
Through extensive research and experimentation in keto baking, I’ve found that adding protein powder to keto cakes and muffins significantly improves their texture and stability. Gluten, a protein found in traditional flours, provides structure to baked goods. Since almond and coconut flours are gluten-free, incorporating a dry protein like whey or plant-based protein helps to mimic that structural support, resulting in a lighter, fluffier cake that holds its shape beautifully and doesn’t crumble.
Absolutely! This magnificent Keto Cheesecake Cake freezes wonderfully. You have the option to freeze the entire cake for future special occasions or cut it into individual slices for convenient portion control. Just be sure to wrap it tightly in plastic wrap and then in aluminum foil to prevent freezer burn. When properly stored, it will maintain its deliciousness for at least two months.
This particular keto cheesecake cake recipe is thoughtfully designed to be low-carb. Each generous slice (which is 1/16th of the entire cake) contains approximately 6.8 grams of total carbohydrates and a substantial 2.5 grams of fiber. This brings the net carbohydrate count down to a mere 4.3 grams per serving, making it a perfectly guilt-free indulgence for your keto journey.
Keto Cheesecake Cake Recipe
Ingredients
Cheesecake Layer
- 16 ounces (453.59 g) cream cheese, softened
- 1/4 cup (57.5 g) sour cream
- 1/2 cup (100 g) allulose sweetener
- 1 tsp vanilla extract
- 2 large eggs, room temperature
Chocolate Cake Layers
- 7 tbsp (49.71 g) coconut flour
- 1/2 cup granular sweetener
- 1/4 cup cocoa powder
- 2 tbsp whey protein powder
- 1 1/2 tsp baking powder
- 1/4 tsp salt
- 4 large eggs
- 1/3 cup (78.86 ml) avocado oil, or melted butter
- 1/2 tsp vanilla extract
- 1/3 cup (78.86 ml) leftover coffee or water
Chocolate Frosting
- 3 ounces (85.05 g) unsweetened chocolate, chopped
- 4 ounces cream cheese, softened
- 6 tbsp (85.21 g) butter, softened
- 1/2 cup (95 g) powdered sweetener
- 1 tsp vanilla extract
- 3/4 cup (177.44 ml) heavy whipping cream, divided
Instructions
Cheesecake Layer
- Preheat the oven to 300ºF (150ºC) and grease an 8-inch round baking pan with a removable bottom. Line the pan with parchment paper and grease the paper.
- In a large bowl, beat the cream cheese on medium for 1 to 2 minutes, until super creamy. Beat in the sour cream, then beat in the sweetener and vanilla extract until well combined.
- Beat in the eggs one at a time until just barely incorporated, scraping the beaters, and the bottom and sides of the bowl in between.
- Pour the filling into the pan and gently shake from side to side to even it out. Tap lightly on the counter to release any air bubbles. Bake 30 to 40 minutes, or until the edges are set and the center still jiggles slightly. Remove from oven and let cool completely.
- Run a sharp knife around the insides of the pan and remove the sides. Wrap tightly and place in the freezer until solid.
Chocolate Cake Layers
- Preheat the oven to 350ºF (175ºC) and grease two 8-inch round cake pans very well. Line the bottoms with parchment paper and grease the paper.
- In a large bowl, whisk together the coconut flour, sweetener, cocoa powder, protein powder, baking powder, and salt. Stir in the eggs, oil, and vanilla extract until well combined.
- Stir in the coffee about ¼ cup at a time until the batter is thick but easily scoopable. Divide the batter evenly between the two pans and spread to the edges.
- Bake 15 to 20 minutes, until the tops of the cakes are just firm to the touch. Remove and let cool before loosening the edges and flipping out onto a wire rack.
Chocolate Frosting
- In a microwave-safe bowl, place the chopped chocolate. Melt in 30 second increments, stirring in between until smooth. Alternatively, you can melt the chocolate in a heat-proof bowl set over a pan of barely simmering water. Set aside to cool to lukewarm.
- In a large bowl, beat together the cream cheese and butter until very smooth. Beat in the sweetener and vanilla extract, then add the chocolate mixture and beat until smooth. Add two tablespoons of the heavy cream and beat until well combined.
- In another bowl, beat the remaining heavy cream until it holds stiff peaks. Carefully fold the whipped cream into the chocolate frosting until no streaks remain.
To Assemble
- Place one layer of chocolate cake on a platter or cake stand. Use about 1/3 cup of the frosting to spread the top of the layer, all the way to the edges.
- Remove the cheesecake layer from the freezer and carefully flip onto the cake. Remove the parchment paper if it has stuck to the bottom. Spread the cheesecake layer with another 1/3 cup of the frosting.
- Place the second layer of chocolate cake on top of the cheesecake. Spread the top and sides of the cake with more frosting. Place any remaining frosting in a piping bag fitted with a star tip and pipe rosettes around the top edge of the cake.