
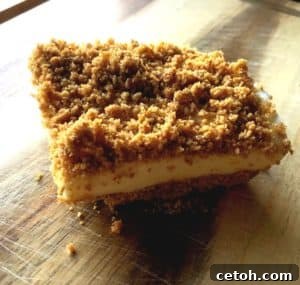
Indulge in a Classic: The Ultimate Gone With The Wind Dessert Recipe
Step back in time with a beloved family classic, the “Gone With The Wind” dessert. This timeless treat holds a special place in my heart, reminiscent of cherished moments spent with my mom and her Grandma. We recently recreated this nostalgic delight, and while the original was wonderful, we couldn’t resist making a few small, yet impactful, tweaks to elevate it to new heights. The result is a dessert that’s not only incredibly delicious but also boasts a luxurious texture and depth of flavor that will transport you straight back to grandma’s kitchen. Get ready to discover your new favorite dessert!
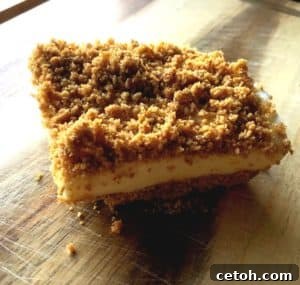
Why You’ll Love This Revamped Gone With The Wind Dessert
This isn’t just any dessert; it’s an experience. Our updated “Gone With The Wind” recipe combines a rich, silky smooth custard with a unique, aromatic graham cracker crust, enhanced by the magic of browned butter. It’s a harmonious blend of creamy, crunchy, sweet, and nutty notes that will captivate your taste buds. Perfect for family gatherings, special occasions, or simply a luxurious treat on a quiet evening, this dessert is surprisingly easy to make and guaranteed to impress. The subtle brightness from lemon zest cuts through the richness, while a hint of cinnamon in the crust adds a warm, inviting spice. Prepare for compliments!
Explore More Delicious Creations: Our Favorite Dessert Recipes
Craving more sweet inspirations? We’re passionate about desserts and always experimenting with new flavors and classic favorites. Be sure to explore our extensive collection of Desert Recipes for more amazing treats that are perfect for any occasion. From quick weeknight sweets to show-stopping centerpieces, you’ll find something to satisfy every craving!
The Secret to Our Revamped Gone With The Wind Recipe: Key Ingredients
The beauty of this dessert lies in its simple yet powerful ingredients. Each component plays a vital role in creating the perfect balance of flavor and texture. We’ve meticulously chosen and portioned each item to ensure a consistently spectacular result every time you make it. Here’s a detailed look at what you’ll need to create this masterpiece:
For the Luscious Custard Filling:
- 1 Cup Milk: The base for our silky smooth custard. Whole milk is recommended for the richest flavor.
- 1 Cup Granulated Sugar: Sweetens the custard to perfection.
- 2 Large Egg Yolks: Provide richness, color, and act as a natural thickener for the custard.
- 2 Packets (approx. 14g total) Unflavored Gelatin: Essential for setting the custard to a firm, yet delicate consistency.
- 1/4 Cup Cold Water: Used to “bloom” the gelatin, ensuring it dissolves smoothly and sets correctly.
- Zest of 1 Whole Lemon: Adds a bright, refreshing citrus note that beautifully balances the sweetness and richness of the custard. Don’t skip this!
- 1 and 1/2 Cups Heavy Cream: Whipped until stiff, it’s folded into the cooled custard to create a light, airy, and incredibly luxurious texture.
- 2 Large Egg Whites: Whipped to stiff peaks, they contribute to the dessert’s signature light and fluffy consistency.
- 1 Teaspoon Pure Vanilla Extract: Enhances all the flavors in the filling, adding a classic warmth.
- Pinch of Salt: A small but mighty ingredient that brightens and balances the sweetness of the entire dessert.
For the Signature Browned Butter Graham Cracker Crust:
- 14.4 oz. Box Cinnamon Graham Crackers: The foundation of our crust, providing a delightful crunch and hint of spice.
- 4 Tablespoons Light Brown Sugar: Adds a deeper, molasses-rich sweetness to the crust, complementing the cinnamon.
- 8 Tablespoons (1 stick) Unsalted Butter: The magic ingredient that transforms into nutty, aromatic browned butter, elevating the crust to an unforgettable level.
- 1 Teaspoon Ground Cinnamon: While the graham crackers have some, an extra touch of cinnamon enhances the warmth and spice profile of the crust, making it truly irresistible.
Step-by-Step: How to Master the Gone With The Wind Dessert
Creating this stunning dessert is a rewarding process, and with our detailed instructions, you’ll achieve perfection every time. We’ve broken down each step to ensure clarity and provide helpful tips along the way. Remember, patience and attention to detail are key to crafting this exceptional treat.
- Prepare the Gelatin: Begin by blooming your gelatin. In a small, cold-proof bowl, pour in the 1/4 cup of cold water. Evenly sprinkle the contents of two packets of unflavored gelatin over the surface of the water. Do not stir. Allow it to sit undisturbed for 5-10 minutes. This allows the gelatin granules to absorb the water and swell, ensuring a smooth dissolution later. Set this bowl aside.
- Craft the Custard Base: Next, prepare your double boiler. If you don’t have one, place a heat-safe metal bowl over a pot containing a couple of inches of simmering water, ensuring the bottom of the bowl does not touch the water. In this metal bowl, combine the 1 cup of milk, 1 cup of granulated sugar, the 2 egg yolks, and the zest of a whole lemon. Whisk these ingredients together until well combined.
- Cook the Custard: Place your metal bowl over the simmering water on medium-high heat. Whisk the mixture occasionally, being careful to scrape down the sides, for about 15 minutes. The mixture should begin to thicken slightly and coat the back of a spoon. This slow, gentle cooking prevents the eggs from scrambling and ensures a smooth custard.
- Incorporate Gelatin and Cool: After 15 minutes, remove the bowl briefly from the heat. Stir in your bloomed gelatin until it is completely dissolved and no granules remain. Return the bowl to the heat and continue to whisk for another 10 minutes, allowing the gelatin to fully integrate and activate. Once cooked, remove the bowl from the heat and transfer the custard mixture to the refrigerator to cool completely. This cooling step is crucial for the custard to thicken and firm up before combining with the other components.
- Prepare the Graham Cracker Crumbs: While the custard is cooling, start on your crust. Place the entire box of cinnamon graham crackers into a food processor or high-speed blender. Pulse until the crackers are reduced to a fine, uniform crumb. Avoid over-processing, which can turn them into a paste. Add the 4 tablespoons of brown sugar and 1 teaspoon of ground cinnamon to the crumbs and pulse a few more times to combine thoroughly.
- Master the Browned Butter: Now for the “star of the show” – browned butter! If you’ve never experienced browned butter, prepare for a revelation. In a light-colored pan (this helps you see the color change), melt the 8 tablespoons of unsalted butter over medium heat. The butter will melt, then begin to foam. Keep a close eye on it. As it cooks, the foam will subside, and you’ll see tiny golden-brown specs forming at the bottom of the pan. A rich, nutty aroma, similar to hazelnuts, will fill your kitchen. This is your cue! Immediately remove the pan from the heat to prevent burning, as it can go from perfect to burnt very quickly.
- Assemble the Crust: Once your butter is beautifully browned and fragrant, pour it directly into the graham cracker mixture. Mix thoroughly until all the crumbs are moistened and resemble wet sand. Grab a 9×12 inch baking pan. Press about three-quarters of the graham cracker goodness firmly and evenly into the bottom of the pan to form your crust. Ensure it’s compact and covers the entire base. Reserve the remaining one-quarter of the crumb mixture to sprinkle on top of the finished dessert. Set both the pan with the crust and the reserved crumbs aside.
- Whip Egg Whites and Cream: In a clean stand mixer bowl with a whisk attachment, whip the 2 egg whites until stiff peaks form. The peaks should hold their shape firmly when the whisk is lifted. Carefully transfer these whipped egg whites to a separate, large bowl. Without cleaning the mixer bowl, add the 1 and 1/2 cups of heavy cream, a pinch of salt, and 1 teaspoon of vanilla extract. Whip until stiff peaks form, similar to the egg whites.
- Combine and Layer: Gently fold the whipped egg whites into the whipped cream mixture using a spatula. Use a light hand to preserve the airiness. When your custardy mixture in the fridge has cooled completely and is firm, retrieve it. Add the cooled custard to the whipped cream and egg white mixture. Fold everything together carefully until thoroughly combined and smooth, ensuring no streaks remain. This step requires a delicate touch to maintain the light, fluffy texture.
- Final Assembly and Chill: Pour the combined filling evenly over the prepared graham cracker crust in your 9×12 inch pan. Use an offset spatula or the back of a spoon to spread it out smoothly. Finally, evenly sprinkle the remainder of the reserved graham cracker crumb mixture over the top of the filling. This adds a beautiful visual and an extra layer of texture. Place the entire pan into the refrigerator and allow it to chill for at least 1-2 hours, or until the dessert is completely firm and set.
- Serve and Enjoy: Once firm, slice into generous portions, serve, and prepare to be delighted! This dessert is best enjoyed chilled.
Expert Tips for a Flawless Gone With The Wind Dessert
Achieving dessert perfection is often in the details. Here are a few expert tips to ensure your “Gone With The Wind” turns out beautifully every time:
- Don’t Rush the Bloom: Giving gelatin ample time to bloom in cold water is crucial for a smooth, lump-free custard.
- Double Boiler Control: When cooking the custard, maintain a gentle simmer in the bottom pot. High heat can lead to scrambled eggs. Constant, gentle whisking is also key.
- Browned Butter Vigilance: Stay at the stove when browning butter. It can turn from perfectly golden to burnt in a matter of seconds. Trust your nose for that nutty aroma!
- Cool Custard Completely: Ensure your custard is thoroughly cooled and slightly set before folding it into the whipped cream and egg whites. Adding warm custard will melt the delicate foams and result in a dense dessert.
- Gentle Folding: When combining the whipped cream, egg whites, and cooled custard, use a gentle folding technique with a rubber spatula. This preserves the air that gives the dessert its light and airy texture.
- Adequate Chilling Time: Don’t cut the chilling time short. The dessert needs at least 1-2 hours to firm up properly, allowing all the flavors to meld and the gelatin to set. Overnight chilling is even better for optimal texture and flavor.
Variations and Customizations for Your Signature Twist
While the classic “Gone With The Wind” is perfect as is, feel free to get creative and put your own spin on this delightful recipe:
- Crust Alternatives: Experiment with different cookie crumbs! Vanilla wafers, shortbread cookies, or even chocolate wafers could offer interesting flavor variations. Add a pinch of nutmeg or cardamom to the graham cracker crust for an extra layer of spice.
- Citrus Zest: While lemon is traditional, lime or orange zest could provide a different, equally refreshing citrus note.
- Nutty Additions: Fold finely chopped toasted pecans or walnuts into the graham cracker crust for an added layer of crunch and flavor.
- Fruit Toppings: Garnish individual servings with fresh berries (strawberries, raspberries, blueberries) or a light fruit compote for a burst of fresh flavor and color.
- Chocolate Drizzle: A light drizzle of melted dark or white chocolate over the top before serving could elevate the dessert for chocolate lovers.
- Coffee Flavor: Infuse a subtle coffee flavor into the custard by adding a teaspoon of instant espresso powder during the cooking phase.
Serving Suggestions and Storage
Presenting and storing your “Gone With The Wind” dessert correctly will ensure it remains a delightful experience:
- Presentation: For a clean slice, use a sharp knife warmed under hot water and wiped dry between cuts. Garnish with a sprig of fresh mint, a dusting of powdered sugar, or a few fresh berries.
- Best Served Chilled: This dessert is absolutely best when thoroughly chilled. The cool, creamy texture is part of its charm.
- Storage: Store any leftover “Gone With The Wind” dessert tightly covered with plastic wrap in the refrigerator. It will maintain its freshness and delightful texture for up to 3-4 days. While technically edible beyond that, the texture and flavor are best within this timeframe.
- Make-Ahead Marvel: This dessert is an excellent candidate for making ahead! Prepare it a day in advance, chill it overnight, and simply slice and serve when your guests arrive. This allows the flavors to deepen and ensures a perfectly set dessert.
A Timeless Dessert, Reimagined for Your Enjoyment
The “Gone With The Wind” dessert is more than just a recipe; it’s a journey through culinary history and personal memories. With our thoughtful enhancements, this classic has been brought into the modern kitchen without losing an ounce of its nostalgic charm. From the irresistible browned butter graham cracker crust to the incredibly light and creamy lemon-infused custard, every bite is a celebration of flavor and texture.
We encourage you to try this recipe and create your own cherished memories around this magnificent dessert. Whether you’re a seasoned baker or just starting your culinary adventure, you’ll find the process rewarding and the outcome utterly delicious. Share your creations with us, and let’s keep the tradition of incredible homemade desserts alive!