
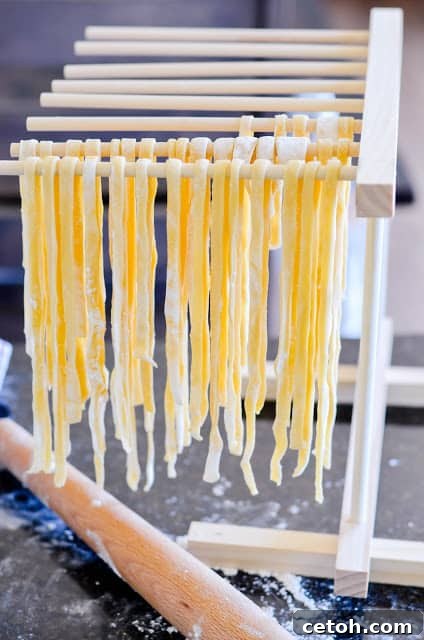
There’s an undeniable magic in homemade pasta. While store-bought options serve their purpose, nothing quite compares to the tender bite, rich flavor, and satisfying texture of pasta made from scratch. Forget everything you thought you knew about making pasta being difficult or requiring fancy equipment. We’re here to shatter those myths! This comprehensive guide will show you just how incredibly quick and easy it is to create your own fresh pasta at home, even if you don’t own a pasta maker.
Imagine the aroma filling your kitchen, the simple joy of working with your hands, and the incredible reward of serving a dish that tastes truly authentic and undeniably superior. Get ready to embark on a culinary journey that will transform your pasta nights forever. Let’s make some delicious, fresh pasta!
Looking for More Inspiration?
Explore a world of flavors with our extensive collection of PASTA RECIPES and discover your next favorite meal.
Mastering Homemade Pasta: A Beginner’s Guide
Why Bother with Homemade Pasta? The Unbeatable Difference
You might be wondering, “Why should I make my own pasta when I can buy it so easily?” The answer lies in an unparalleled sensory experience. Freshly made pasta boasts a texture that’s tender yet firm, with a delicate chewiness that dried pasta simply can’t replicate. It absorbs sauces more beautifully, clinging to every drop of flavor, and truly elevates any dish it graces. Beyond the taste, there’s a profound satisfaction in creating something delicious with your own hands. It’s a therapeutic process, a connection to culinary traditions, and a wonderful activity to share with family.
Moreover, making pasta from scratch gives you complete control over the ingredients. You know exactly what goes into your meal, allowing you to choose high-quality flour and fresh eggs, free from any additives or preservatives. This makes for a healthier, more wholesome meal that tastes incredible.
What You’ll Need: Simple Ingredients for Extraordinary Results
Ingredients:
- 3 cups of all-purpose flour: While “00” flour is often hailed as the gold standard for pasta making, good quality all-purpose flour works wonderfully and is more readily available. Ensure it’s fresh for the best results.
- 6 large whole eggs: Fresh, high-quality eggs are crucial for the flavor, color, and texture of your pasta dough.
- (Optional) A pinch of salt: Some prefer to add a small pinch of fine sea salt to the flour for enhanced flavor.
That’s it! Just two core ingredients stand between you and the most incredible pasta you’ve ever tasted. The simplicity is part of its charm, allowing the natural flavors of the flour and eggs to shine through.
Tools of the Trade (No Pasta Maker Required!)
Don’t be intimidated by the idea of needing specialized equipment. While a pasta machine can make rolling faster, it’s absolutely not essential. Many traditional Italian nonnas make pasta by hand using only a few basic kitchen tools:
- A large, clean work surface: A countertop, a large wooden board, or a pastry board works perfectly.
- A fork: For whisking the eggs.
- Your hands: Your most important tool for kneading and feeling the dough.
- A rolling pin: A long, heavy rolling pin is ideal for achieving thin sheets of dough.
- A sharp knife or pastry wheel: For cutting your pasta into desired shapes. You can even use string!
- Plastic wrap or a damp kitchen towel: For resting the dough.
- (Optional) Pasta drying rack: If you plan to dry your pasta. Otherwise, a floured surface works fine.
How to Make This Easy Homemade Pasta: A Step-by-Step Journey
-
Prepare Your Work Surface and Flour Well
Start by generously dumping the three cups of all-purpose flour directly onto your clean work surface. Think of it as creating a small mountain. Then, using your hands or the bottom of a bowl, create a large well (a crater, if you will) in the center of the flour. Make sure the walls of the well are sturdy and high enough to contain the eggs without them spilling over. A wider, deeper well than pictured is often helpful for beginners.
-
Add the Eggs to the Well
Carefully crack all six whole eggs directly into the center of the flour well. Try to keep them contained within the flour walls. This method, known as the “fountain” or “volcano” method, is a classic approach to pasta making that allows for gradual incorporation of ingredients.
-
Gently Whisk and Incorporate Flour
Using a fork, gently break the egg yolks and begin whisking them together. As you whisk, gradually draw in small amounts of flour from the inner walls of the well, incorporating it into the eggs. Continue this process slowly, ensuring the eggs don’t burst through the flour barrier. You’re aiming for a thick, pasty consistency in the center that will prevent any raw egg from spilling out as you continue to mix.
-
Knead the Dough to Perfection
Once the mixture is thick enough not to spill, set aside the fork and use your hands. Begin to gather all the flour and egg mixture, pressing and folding it together. Now, the real work begins: kneading. Knead the dough vigorously for about 8-10 minutes. Use the heel of your hand to push the dough away from you, fold it over, and rotate it, repeating the process. The dough will feel shaggy at first, but with consistent kneading, it will transform into a smooth, elastic, and homogenous ball. If the dough is too sticky, add a very small amount of flour (a teaspoon at a time) to your work surface. If it feels too dry and crumbly, moisten your hands slightly and continue kneading. The dough should spring back when lightly poked.
-
Rest and Divide the Dough
Form the smooth dough into a ball, cover it tightly with plastic wrap or a damp kitchen towel, and let it rest at room temperature for at least 20-30 minutes. This resting period is crucial as it allows the gluten to relax, making the dough much easier to roll out evenly and thinly. While you *can* skip this step if you’re truly pressed for time, taking these few extra minutes will significantly improve your rolling experience. After resting, divide the dough into four equal sections. Keep the sections you’re not working with covered to prevent them from drying out.
-
Roll Out the Dough (Thin is Key!)
Working with one section of dough at a time, lightly flour your work surface and the dough itself. Using a rolling pin, begin to roll the dough out. Start from the center and roll outwards, rotating the dough frequently to ensure even thickness. The goal is to roll the dough as thin as possible – you should almost be able to see through it. If using a pasta machine, pass it through the widest setting, then progressively narrow settings until you reach your desired thinness (usually setting 6 or 7 for most machines). Keep the dough and surface lightly floured throughout to prevent sticking.
-
Flour, Fold, and Slice
Once your dough is rolled to the desired thinness, spread a generous amount of flour over its entire surface. This step is SUPER important and should not be skipped, as it prevents the pasta from sticking to itself. Then, carefully roll up the floured dough sheet into a loose log, similar to how you would roll cinnamon roll dough. Using a sharp knife or even a piece of kitchen string (for a rustic touch, just like with cinnamon rolls!), slice thin spirals of the dough. The thickness of your slices will determine the width of your pasta (e.g., thinner slices for tagliatelle, wider for pappardelle).
-
Unravel, Dry, and Cook
Gently unravel each spiral of sliced dough to form individual pasta strands. This is a fun task that even kids love to help with! If you have a pasta rack, hang the strands to dry slightly. If not, don’t worry! Loosely toss them with a little extra flour and spread them out on your floured work surface. They don’t need to be laid out perfectly straight; a loose pile is perfectly fine. At this point, you can either let them air dry for a few hours (or longer for future use) or cook them immediately. Fresh pasta cooks incredibly fast in boiling, salted water, usually in just 2-3 minutes until al dente. Keep an eye on them – you’ll be ready to enjoy your delicious homemade meal in no time!
Storing Your Homemade Pasta
Fresh pasta can be cooked immediately or stored for later. If cooking within a day, loosely cover and refrigerate. For longer storage, you have a few options:
- Drying: Lay pasta flat on a floured surface or hang on a rack until completely brittle (12-24 hours, depending on humidity). Store dried pasta in an airtight container at room temperature for several weeks.
- Freezing: Lightly dust fresh pasta with flour and arrange it in single layers on a baking sheet. Freeze until solid, then transfer to an airtight freezer bag. Cook directly from frozen, adding a minute or two to the cooking time. It can last for up to 1-2 months.
Serving Suggestions
The beauty of fresh pasta is its versatility. It shines with simple sauces that allow its delicate flavor to come through. Try it with a classic marinara, a rich Alfredo, a light lemon-butter sauce, or simply with good quality olive oil, garlic, and freshly grated Parmesan cheese.
Nutrition Information:
- Yield: 4 servings
- Serving Size: 1
- Amount Per Serving:
- Calories: 449
- Total Fat: 8g
- Saturated Fat: 2g
- Trans Fat: 0g
- Unsaturated Fat: 5g
- Cholesterol: 279mg
- Sodium: 108mg
- Carbohydrates: 72g
- Fiber: 3g
- Sugar: 1g
- Protein: 19g