
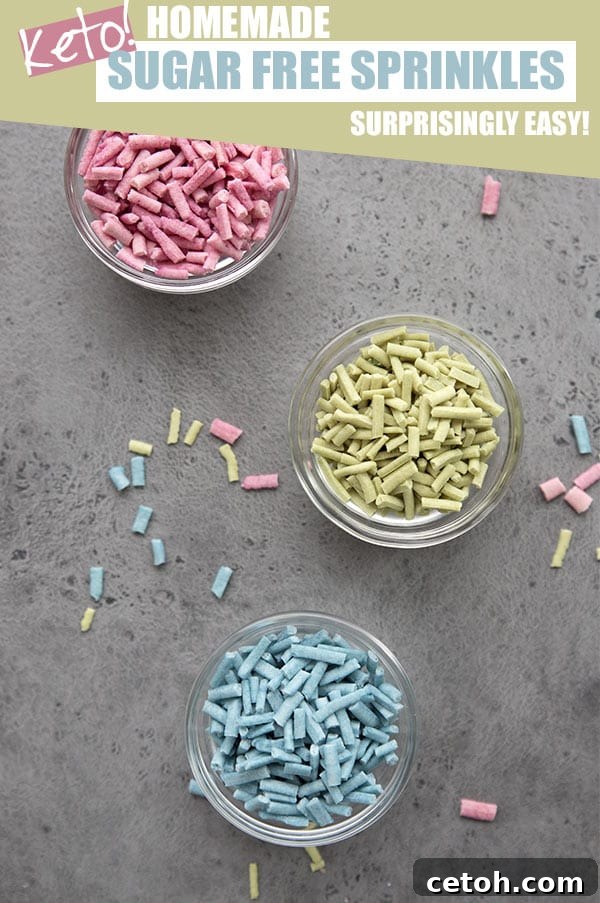
Homemade Sugar-Free Sprinkles: The Ultimate Keto Dessert Embellishment
Are you searching for that perfect, zero-carb touch to make your keto cakes, cookies, and other baked goods truly spectacular? Look no further! Homemade sugar-free sprinkles are an absolute game-changer for any keto baker. These vibrant, low-carb adornments are not only easy and enjoyable to make, but they also bring an unparalleled level of visual appeal and festive fun to your healthy dessert creations, transforming ordinary treats into extraordinary delights without compromising your dietary goals.
The Evolution of Sprinkles: A Keto Baker’s Unexpected Journey
For a long time, sprinkles held a rather peripheral position in my baking world. Personally, I was never particularly smitten by them. While their visual charm was undeniable, their inherent lack of flavor often meant they were relegated to mere aesthetic accents. Even in my pre-keto days, when I indulged in high-carb treats, I used sprinkles sparingly, typically preferring the rich taste of chocolate chips, luscious chocolate ganache, or the zesty brightness of citrus peels for decoration.
However, the arrival of three vibrant young children into my life fundamentally shifted this perspective. Kids possess an incredible ability to find joy in the simplest, most colorful things, and sprinkles, with their dazzling hues, are certainly among them. Witnessing their wide-eyed excitement over a brightly decorated cookie or cake helped me grasp the profound appeal of these tiny bursts of color. It sparked a realization: if I could create a sugar-free, keto-friendly version, it would not only delight my children but also empower countless other keto bakers to infuse more joy and festivity into their low-carb culinary adventures.
The Quest for Keto Sprinkles: From Rarity to Ready Availability
Not so long ago, the notion of accessible sugar-free sprinkles was almost entirely unheard of. In those days, a few teaspoons of conventional, sugar-laden sprinkles might occasionally grace my keto creations – a small concession to mainstream appeal, often accompanied by a quiet internal debate about carbohydrate counts. The idea of embarking on a homemade version seemed too complex, too far-fetched to even consider.
The turning point arrived during an ordinary Instagram scroll. I stumbled upon an incredible revelation: a company aptly named The Sprinkle Company was selling actual sugar-free sprinkles! This discovery was particularly exciting as I was in the thick of developing recipes for my upcoming book, The Ultimate Guide to Keto Baking. The thought of adding these delightful, keto-compliant embellishments to my book’s photographs and recipes filled me with immense enthusiasm.
I promptly reached out and was thrilled to discover that the creative force behind these ingenious sprinkles was my esteemed keto blogging colleague, Nicole from Oh My Keto. She had launched her charming sprinkle collection on Etsy, and I was overjoyed to support her innovative spirit and try them for myself. Nicole offers a fantastic variety of colors and unique combinations, and I’ve since become a repeat customer. While they undeniably come with a higher price tag (a justifiable reflection of the significant time, effort, and care invested in their production and shipping), they are a worthwhile indulgence for those special occasions when you want to add an extra touch of magic to your keto treats. It’s also encouraging to note that other reputable keto brands, like Good Dee’s, are now introducing their own lines of sugar-free sprinkles, signaling a growing and vibrant market for these delightful low-carb decorations.
The Art and Science of Homemade Sugar-Free Sprinkles
Despite the availability of commercial options, my curious baking mind couldn’t help but wonder: could I replicate the magic of sugar-free sprinkles at home? The idea of creating my own batch, controlling every ingredient, and customizing the colors felt incredibly appealing. This spark of curiosity ignited a deep dive into culinary research, where I explored various homemade sprinkle recipes, including intriguing keto and sugar-free adaptations.
Many conventional sprinkle recipes, I discovered, relied heavily on undesirable ingredients like corn syrup. However, a particular recipe from Saveur stood out. Its concise ingredient list – powdered sugar, egg white powder, vanilla, water, and food coloring – seemed perfectly poised for a keto-friendly makeover. This simple combination offered a promising foundation for my experiments.
In a fortunate oversight, I initially misread the Saveur recipe, interpreting “egg white powder” as simply “liquid egg whites.” Without hesitation, I reached for a carton of pasteurized organic egg whites and began my first attempt. This “mistake” turned out to be a stroke of genius, leading to a pivotal moment of discovery. As I started working with the liquid egg white mixture, I realized I was onto something truly promising. My initial batch yielded a vibrant, pliable sugar dough, remarkably similar in texture and consistency to traditional fondant. My first thought was to roll this dough incredibly thin and meticulously cut out tiny circles, aiming for confetti-style sprinkles. While technically achievable, the sheer effort and time required proved prohibitive, and I quickly pivoted away from this labor-intensive confetti method.
Undeterred, I adjusted my strategy. By adding a touch more water, I transformed the dough into a thicker, yet perfectly pipeable paste. This allowed me to adopt the classic method for creating “jimmie” style sprinkles: piping long, thin lines onto waxed paper, allowing them to dry completely, and then carefully chopping them into small pieces. To my immense satisfaction, this approach worked flawlessly, yielding perfectly formed, slender sprinkles.
The inspiration for confetti sprinkles, however, returned with a flash of insight. I remembered how effectively I used a honeycomb silicone trivet, much like this one, to create my homemade sugar-free chocolate chips. The idea struck me: could I spread the sprinkle paste into the individual hexagonal cavities of the trivet to form uniform, circular confetti pieces? Indeed, it worked like a charm! This innovative technique allowed me to effortlessly produce both classic “jimmie” and charming confetti-style sugar-free sprinkles, turning a creative challenge into a delightful success.
Your Essential Guide: How to Make Perfect Homemade Sugar-Free Sprinkles
While the process of crafting your own sugar-free sprinkles is straightforward, it does require a dedicated chunk of time and a dash of patience. To maximize your efficiency and ensure you have a generous supply, I highly recommend setting aside a morning or an afternoon specifically for this project. Plan to make a substantial batch so you have plenty of vibrant sprinkles ready to adorn multiple keto recipes in the future.
1. The Sweetener: A Non-Negotiable Choice
The type of sweetener you choose is paramount for the success of your sugar-free sprinkles. You absolutely must use a powdered erythritol sweetener, such as Swerve. The critical reason for this specific choice lies in erythritol’s unique ability to harden completely when it dries. This crystallization and hardening property is indispensable for the sprinkles to firm up, maintain their shape, and become brittle enough to be cut or broken into individual pieces. Other popular keto sweeteners, such as Bocha Sweet, will unfortunately not solidify in the same manner, leaving you with a sticky, beautiful, but ultimately unusable colorful goo. In this particular recipe, erythritol’s tendency to harden, which can sometimes be a challenge in other keto baking applications, becomes its greatest asset!
2. The Egg Whites: Structure and Stability
Similar to the role they play in traditional royal icing, egg whites are crucial for imparting structure and stability to these sugar-free sprinkles. They act as an essential binder, facilitating the hardening process and ensuring that the sprinkles retain their intricate shapes once dry. For both convenience and food safety, pasteurized carton egg whites are the optimal choice. They offer consistent quality, are easy to measure, and eliminate any concerns associated with using raw egg whites.
3. Natural Food Coloring: Achieving Your Desired Hues
For vibrant and healthy sprinkles, I highly recommend using natural vegetable dye powders, such as those produced by Color Kitchen. These natural dyes deliver intense initial colors, but it’s important to anticipate that their shades will mellow and lighten to more pastel tones as the sprinkles fully dry. If you desire a more vivid or deeper color palette, simply add a little extra dye to your mixture. While the package instructions might suggest using an entire envelope, this is typically far too much for our recipe. Begin with a small amount, gradually incorporating it into the paste until you achieve your preferred color intensity. Remember the golden rule: you can always add more color, but you can’t take it away!
4. Water Content: Mastering the Perfect Consistency
Achieving the correct consistency for your sprinkle paste is key to successful piping. You’ll need just enough water to create a thick, yet smoothly pipeable paste that easily flows through the small opening of a piping bag or a snipped corner of a Ziploc bag. The precise amount of water can fluctuate based on several variables, including the specific brand of powdered sweetener you’re using, the humidity level in your kitchen, and even the type of food coloring. A sensible starting point is 1 tablespoon of water. After incorporating that, add water in 1-teaspoon increments, mixing thoroughly after each addition, until your paste is firm enough to hold its shape but fluid enough to pipe without excessive force.
5. Piping Techniques: Ziploc Bags for Efficiency
While traditional piping bags equipped with fine tips are certainly an option, I’ve discovered that simple Ziploc bags offer superior versatility and convenience, especially when preparing multiple colors. Using a single piping tip for various colors would necessitate constant, meticulous washing between each shade, a time-consuming chore. With Ziploc bags, you can effortlessly prepare all your distinct colored mixtures simultaneously. Simply spoon each colored paste into its own Ziploc bag, seal it securely, and then carefully snip off just the tiniest bit from one corner. This small, precise opening will allow you to pipe fine, controlled lines with ease.
6. Embracing Imperfection: The Charm of Handmade
Do not be discouraged by slight imperfections during the piping stage! It’s perfectly normal for your lines to be a little wiggly, slightly uneven, or to vary in thickness. Once these dried lines are chopped into tiny, individual sprinkles, these minor irregularities become virtually unnoticeable. In fact, these subtle variations often contribute to the unique, charming, and distinctly artisanal character of homemade sprinkles. Rest assured, your finished sprinkles will look absolutely fantastic!
7. The Crucial Drying Process: Patience is a Virtue
This step is arguably the most critical: your sprinkles must be allowed to dry completely. This process typically requires at least 24 hours, so cultivating patience is essential. Arrange your baking sheets in a cool, dry place, ensuring they remain undisturbed. Resist the temptation to touch or move the sprinkles until they are absolutely rock hard to the touch. Once thoroughly dried, you can easily break the larger lines with your fingers or use a sharp knife to chop them into uniform small pieces, creating your desired sprinkle size and shape.
8. Crafting Confetti-Style Sprinkles: A Clever Shortcut
For those delightful confetti-style sprinkles, the method is a little different. Instead of piping thin lines, you’ll spread the slightly thicker paste evenly into the individual cavities of a honeycomb silicone trivet. This clever technique ensures uniform, circular shapes. Due to the slightly thicker application of the mixture in the trivet, these confetti sprinkles will require a bit more drying time – typically between 24 and 48 hours. Once they are fully dry and hardened, they will effortlessly pop right out of the trivet, ready to add a burst of circular cheer to your desserts.
Storage and Shelf Life: Keeping Your Keto Sprinkles Fresh
One of the many appealing aspects of these homemade sugar-free sprinkles is their impressive shelf life. Because they are completely dry and contain no sugar, they are remarkably stable and resistant to spoilage. While some reputable sources, such as Saveur, suggest a conservative storage duration of up to two weeks for optimal safety, my personal experience has shown that these sprinkles can last significantly longer without any degradation in quality. To maintain their vibrant color, firm texture, and prevent any moisture absorption, it is essential to store your finished sprinkles in an airtight container at room temperature. This will ensure they remain crisp, colorful, and ready for your next keto baking adventure whenever inspiration strikes.
Unlock a World of Color: Creative Ways to Use Your Keto Sprinkles
With your freshly made batch of homemade sugar-free sprinkles, the possibilities for adorning your keto desserts are truly boundless! Here are just a few ideas to ignite your culinary creativity and add that extra special touch:
- Keto Funfetti Cakes and Cupcakes: For a delightful “funfetti” effect, gently fold a generous amount of sprinkles directly into your keto cake or cupcake batter just before baking.
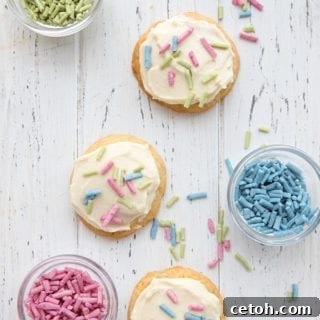
- Decorate Frosted Cookies: Liberally sprinkle them over freshly frosted keto sugar cookies, almond flour shortbread, or even gingerbread cookies for an instant festive upgrade.
- Jazz Up Keto Fat Bombs: Roll your finished fat bombs in a colorful mix of sprinkles to add both visual appeal and an interesting textural contrast.
- Elevate Keto Ice Cream: Use them as a delightful topping for your favorite homemade or store-bought keto ice cream, frozen yogurt, or a simple chaffle a la mode.
- Brighten Single-Serving Treats: A sprinkle of these colorful gems over a quick keto mug cake, chaffle, or a bowl of keto pudding can make it feel incredibly special.
- Garnish Keto Parfaits: Create stunning layered desserts by incorporating sprinkles between layers of keto yogurt, sugar-free pudding, and fresh berries.
- Custom Holiday Creations: Easily customize the colors of your sprinkles to match any holiday or special occasion – think vibrant red and green for Christmas, soft pastels for Easter, or spooky orange and black for Halloween!
You are truly going to have an incredible amount of fun experimenting with these vibrant, homemade sugar-free sprinkles. I’ve already had the pleasure of incorporating them into several delightful recipes, including the visually stunning Keto Funfetti Cookies featured in some of these photos – keep an eye out for that recipe coming soon! The most incredible aspect of these sprinkles is their nutritional profile: zero carbs and practically no calories per serving. This makes them the quintessential guilt-free garnish, allowing you to beautifully decorate all your cherished keto desserts and elevate any celebration with a burst of color and cheer.
Homemade Sugar-Free Sprinkles
Yields: Approximately 24 servings
Prep Time: 1 hr | Total Time: 1 hr (plus 24-48 hours drying time)
Craft your own vibrant, zero-carb sugar-free sprinkles at home! This easy recipe takes your keto baking to the next level, adding a fun, festive touch to cakes, cookies, and more without any added sugar.
Ingredients
- 1 cup powdered erythritol sweetener (such as Swerve)
- 1 tbsp pasteurized egg white (from a carton works best for convenience)
- 1/2 tsp vanilla extract
- 2 to 5 tsp water (adjust as needed for desired consistency)
- Natural food coloring (powdered vegetable dyes recommended)
Instructions
- In a medium-sized bowl, thoroughly whisk together the powdered erythritol sweetener, pasteurized egg white, and vanilla extract until well combined. Begin by drizzling in 1 tablespoon of water, then continue to add water 1 teaspoon at a time, mixing thoroughly after each addition, until the mixture forms a thick, smooth, and pipeable paste. The consistency should be firm enough to hold its shape but fluid enough to extrude easily.
- Divide the prepared paste into several smaller bowls, allocating one bowl for each distinct color you wish to create. Add a small amount of your chosen natural food coloring to each bowl and mix vigorously until a uniform color is achieved. Keep in mind that the colors will likely lighten as the sprinkles dry, so you might aim for a slightly deeper shade than your desired final result.
- For classic “jimmie” style sprinkles: Carefully spoon each colored paste into separate Ziploc bags. Seal the bags securely, then use scissors to snip off a tiny portion of one corner (aim for a very small opening for fine lines). Pipe thin, straight lines of the paste onto a baking sheet that has been lined with parchment paper or waxed paper. Don’t worry if your lines aren’t perfectly uniform; the beauty of homemade sprinkles often lies in their slight imperfections.
- For confetti-style sprinkles: As an alternative, or in addition to jimmies, spread the colored paste thinly and evenly into the individual hexagonal or circular cavities of a honeycomb silicone trivet or similar mold. This method yields perfectly shaped, flat confetti sprinkles.
- Allow the piped sprinkle lines or the trivet-filled paste to dry completely. This is a critical step and requires significant patience. The drying process will take a minimum of 24 hours for jimmies, and often 24 to 48 hours for the slightly thicker confetti sprinkles. Place the baking sheets or trivets in a cool, dry place, ensuring they remain undisturbed until the sprinkles are completely hard and brittle to the touch.
- Once the sprinkles are thoroughly dried and hardened, gently break the long “jimmie” lines with your fingers or use a sharp knife to carefully chop them into small, sprinkle-sized pieces. For the confetti sprinkles, simply pop them out of the silicone trivet once fully dry.
- Store your vibrant homemade sugar-free sprinkles in an airtight container at room temperature. They will retain their freshness and crispness for up to two weeks, or potentially longer if kept in an exceptionally dry environment.
Nutrition Information
Serving Size: 1 teaspoon | Calories: 2 kcal
I’d love to hear about your experience making these delightful homemade sugar-free sprinkles! Please share your thoughts, tips, and the amazing keto creations you adorn with them.